
Lasagna Planting Fall-Planted Bulbs For Spring Blooms
By Katrina Godshalk
It’s easy to have a non-stop spring bulb parade and create fantastic containers of spring-blooming bulbs... just think lasagna!
Fall-planted, spring-blooming bulbs are true icons of springtime, among the first to tickle our senses with the colorful and fragrant gifts of the garden. It can be a challenge to decide what to plant where, especially given that spring itself has its own seasons. Usually classed as early-spring, mid-spring, and late-spring, these delineations of bloom time are crucial when creating a spring bulb garden.
Luckily for us, Dutch bulb mavens developed what they call "lasagna planting," a way to layer your bulb plantings to create beautiful blooms all spring long, boasting colorful flowers in designs free from gaps in color. Plant three layers of bulbs — early, mid, and late spring — for a full season of flowers. The possibilities are endless, and whether planted in your garden or a container, you can let your creativity be your guide. Try both methods to enjoy the colorful impact of lasagna planting!
Follow our guide for tips on creating your own layered planting!
Jump To:


Choosing Fall-Planted Bulbs For Lasagna Planting
- Planting depth is determined by the size of the bulb, but generally, the larger bulbs bloom later.
- Once you’ve selected your bulbs, simply place them into the correct layer in your planting.
- On a small scale, consider planting a container of classic Tulips or Daffodils with three different bloom times.
- On a large scale, consider a garden bed that changes through the seasons, with early spring Crocus, Muscari, and Scilla in early spring, mid-season Tulips, Daffodils and Hyacinth, followed by tall and stately late-season Darwin Tulips and Allium.
Whether planting in the garden or a container, your considerations are the same: the main factor is bloom time. Choose early-, mid-, and late-spring-blooming bulbs. Mix it up or keep it simple — the choice is yours!
Small Early-Spring Blooming Bulbs
Choose your favorite early-spring blooming bulbs for the first signs of spring! We recommend Crocus, Specie Iris, Scilla, Muscari (Grape Hyacinth), Chionodoxia (Blue Giant Glory Of The Snow), and Galanthus (Snowdrops).
Medium Mid-Spring Blooming Bulbs
Choose your favorite mid-spring blooming bulbs for a burst of color. We recommend Tulips, Daffodils, and Hyacinth.
Large Late-Spring Blooming Bulbs
Choose your favorite late-spring to early-summer blooming bulbs for the finale that carries you into the summer garden. We recommend Daffodils, Tulips, Fritillaria, and Allium.
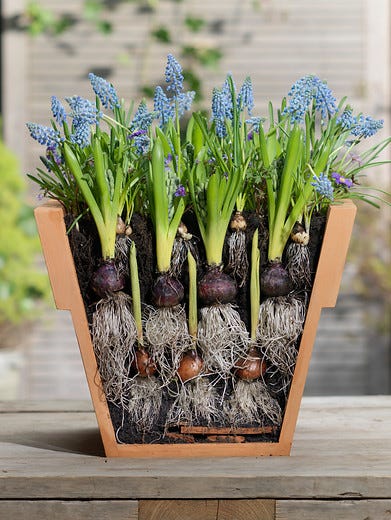
Lasagna Planting In Containers
The size of the container you choose will tell you how many layers of bulbs you can plant. A 10" deep container will hold two layers of bulbs; a 14" container will hold three layers. Make sure that your containers have drainage holes.
In colder zones, consider planting your bulbs in plastic nursery pots to avoid damage to expensive pottery as they may swell and contract with the temperature. They can be slipped inside your decorative containers in spring
Steps For Lasagna Planting In Containers:
- Prepare your containers. Place a layer of gravel in the bottom of the pot, then add a thick layer (2-3") of potting soil mixed with bulb food to your pot.
- Plant the first layer of bulbs. Place the first layer of bulbs in the pot, tightly spaced at about a 1/2" spacing, and cover with 2" of soil.
- Plant the second layer of bulbs. Next, add mid-spring bulbs that should be planted at about 6" deep. Place them close together, but allow some space for the lower bulbs to grow through (1-1 ½" apart). Don’t worry; the lower bulbs will find their way through the upper layers. Cover with 2" of soil.
- Plant the third layer of bulbs. Small bulbs that bloom in early spring. This time cover with 3-4" of soil and a light dressing of bulb food.
- Mulch well and water.

Lasagna Planting In The Garden
In the garden, lasagna planting works best where you have well-drained, loamy soil that can be dug to a depth of 8-12" (for three layers). If your soil is not that deep, go for two layers or just plant one layer in a traditional method. The size is up to you, but as you are planting more densely, even a 2' x 1' area will work nicely.
Bulb lasagna is perfect for areas that can be dug, where you’ll enjoy a concentrated, colorful, non-stop display. Some ideal locations are flower beds near a window or entry where you can enjoy the view, or as a centerpiece in a slowly awakening summer-blooming perennial bed.
In larger garden beds, you can plant in formal rows. Or, if you’d like a more natural, free-form look, scatter the bulbs and plant them where they lay.
If mice, squirrels, voles, or gophers are a problem, consider lining your hole with gravel or chicken wire. Just cut the mesh to line one length plus the sides and lay shorter pieces cross-wise. Also, lay a piece of chicken wire over your new planting when finished to protect from squirrels as the soil resettles (squirrels love easy digging!) Alternatively, consider planting deer-and-critter-resistant Allium, Daffodil, Muscari, Fritillaria, Galanthus, and others as you plan your layout. They may help protect rodent favorites such as Tulips and Crocus.
Steps For Lasagna Planting In The Garden:
- Dig the bed. Make sure your location will receive full sun and has good drainage. Many larger bulbs need to be planted at a depth of 8-9", so if you dig a 12" deep bed, you can loosen and enrich the soil beneath the first layer.
- Amend the soil. Add some bulb food to your soil and backfill your hole to the desired planting depth of the first layer of bulbs, generally around 8-9" deep.
- Plant the first layer of bulbs. Place these bulbs in the soil, closely together but not touching (about a half-inch). Bulb packaging will include planting per square foot. Cover with soil.
- Plant the second layer of bulbs. Add about 2" of soil to bring your depth to about 6". Plant your second layer of bulbs, and leave a bit more room to accommodate the growing stems from lower bulbs, at least 1 ½" apart.
- Plant the third layer of bulbs. Cover the second layer with soil for your top planting depth of 2-3". Here you can plant your last layer of small bulbs. Plant densely and cover with 2-3" of soil. Add some bulb food to this layer and remember to feed your bed again in the spring.
- Water well to remove air pockets. You can cover your area with mulch if desired. In dry areas, water as needed to help the bulbs establish good root growth. Avoid overwatering that could rot bulbs.
© All articles are copyrighted by High Country Gardens. Republishing an entire High Country Gardens blog post or article is prohibited without written permission. Please feel free to share a short excerpt with a link back to the article on social media websites, such as Facebook and Pinterest.