Best practices for Core Argo floats - Part 2: physical handling, deployment and metadata considerations
 Tamaryn Morris1,2*
  Megan Scanderbeg3
  Deborah West-Mack4
  Claire Gourcuff5
  Noé Poffa6
  Tata V. S. Udaya Bhaskar7
  Craig Hanstein8
  Steve Diggs3
  Lynne Talley3
  Victor Turpin9
  Zenghong Liu10
  Breck Owens4
- 1Egagasini Node, South African Environmental Observation Network (SAEON), Cape Town, South Africa
- 2Marine Unit, South African Weather Service (SAWS), Cape Town, South Africa
- 3Climate, Atmospheric Sciences and Physical Oceanography Department, Scripps Institution of Oceanography (SIO), San Diego, CA, United States
- 4Physical Oceanography Department, Woods Hole Oceanographic Institute (WHOI), Falmouth, MA, United States
- 5Euro-Argo European Research Infrastructure Consortium (ERIC), Plouzané, France
- 6Institut Français de Recherche pour l'Exploitation de la Mer (Ifremer), Plouzané, France
- 7Indian National Centre for Ocean Information Services (INCOIS), MoES, Hyderabad, India
- 8Commonwealth Scientific and Industrial Research Organisation (CSIRO), Hobart, TAS, Australia
- 9OceanOPS, Brest, France
- 10Second Institute of Oceanography, Ministry of Natural Resources, Hangzhou, Zhejiang, China
Following on from Part 1: Best Practices for Core Argo floats - Getting started and data considerations, we present Part 2: Best Practices for Core Argo floats in terms of physical handling and deployments and recommended metadata parameters. The objective is to encourage new and developing scientists, research teams and institutions to contribute to the OneArgo Program through increased deployments regionally, specifically to the Core Argo mission. Only by leveraging sustained contributions of current Core Argo float groups with new and emerging Argo teams and users, can the OneArgo initiative be realized. This paper makes involvement with the Core Argo mission smoother by providing a framework endorsed by a wide community for these observations.
1 Introduction
A detailed introduction to the OneArgo Program, its history and roll-out, Argo float design, communication systems, procurement considerations and associated details, was given in Part 1: Core Argo Best Practices. The paper also described how users can access and use Argo datasets and become involved with the program. We advise that users should engage with Part 1: Core Argo Best Practices first, before going into the detail of Argo float handling and deployment aspects as detailed within this paper.
2 Physical handling of Core Argo floats at pre-deployment facilities
Core Argo float types are available from a number of manufacturers in the US, Europe and China, but all adhere to the same strict operational requirements and use one of two Argo Steering Team (AST) approved Conductivity, Temperature and Depth (CTD) instruments. The user is advised to refer back to Part 1: Core Argo float Best Practice (their Table 1) for details regarding the characteristics of each commercially (and some not available but widely used) Core Argo floats.
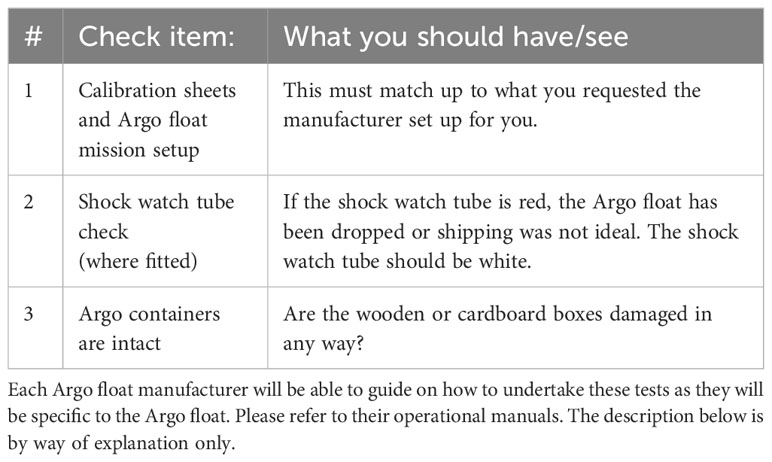
Table 1 Suggested checklist for clients receiving Core Argo floats.
It must be noted that this section pertains to the physical handling and testing of Core Argo floats once they have been received from the manufacturers, but before the Argo floats are loaded onto vessels (or shipped to waiting vessels). While not all Argo teams will have ballasting facilities or water tanks to do tests, it is advised that all groups purchasing and receiving Argo floats should undertake some basic tests, listed in Section 2.1.3, prior to deployment of their floats. All information noted are helpful in understanding the operations of Argo floats and could help with problem solving with the manufacturers should problems be encountered.
2.1 Ballast adjustments prior to shipping of floats
Argo floats profile to 2000 db and need to be neutrally buoyant at this depth. Argo floats are ballasted by determining the volume, and the required weight of the Argo float to be neutrally buoyant at depth. As the density of the ocean varies around the world, Argo floats need to be ballasted according to the ocean basin in which they will be deployed. Many Argo floats can overcome slight ballasting deficiencies. However, with an insufficient bladder volume, surfacing can become a problem in some ocean basins. A method for ballasting floats in a pressure tank is described in (Izawa, 2001). The Argo floats may be ballasted by placing the instrument in a pressure tank or determining the volume at surface pressure. A weight change in an Argo float of 1 g can make approximately a 10 m parking depth difference (Izawa, 2001). Ballasting using the pressure tank is more accurate, however pressure tanks are not always available. Several manufacturers provide surface ballasting and they should be consulted when purchasing an Argo float.
This is not the case for ARVOR and PROVOR Argo floats, which are ready to deploy in any ocean basin once shipped from NKE Marine Electronics (https://nke-instrumentation.com/), and for Argo Navis floats, shipped from Seabird Electronics (https://www.seabird.com/).
2.2 Transportation of Core Argo floats
Argo floats can be shipped either by air freight or sea freight, depending on timeline and budgets. Argo floats can be freighted in plywood crates, with sponge cut-outs to secure the Argo float safely, or ready to deploy cardboard boxes wrapped in plastic wrap. A shock watch, shaped as a shock absorber tube is fixed to the outside of the crates and cardboard boxes to notify freight companies and the receiver if the crates have received rough handling. If the shock watch has been activated (by turning red instead of its normal white color), then careful physical observation is required of the Argo float and crate, plus follow up testing is required to confirm the Argo float is still operational. Notification to the manufacturer of rough handling is also a good idea.
2.3 Testing of Core Argo floats upon receiving at user facilities
It is advised that when receiving Core Argo floats from the manufacturer, the checks listed in Table 1 are undertaken. This is not an exhaustive list and can be adjusted for each Argo facilities’ needs. The tests will help with identifying Core Argo floats that may have small problems that could affect lifetime operation of the float after deployment.
Details in Table 2 have been given for those Core Argo floats that are commercially available (see Part 1: Core Argo Best Practice, Table 1). If Argo teams are receiving Argo floats from non-commercial entities (e.g.,HM2000, APEX-UW), then it is advised that Argo teams discuss directly with these entities any tests that need to be undertaken prior to deployment.
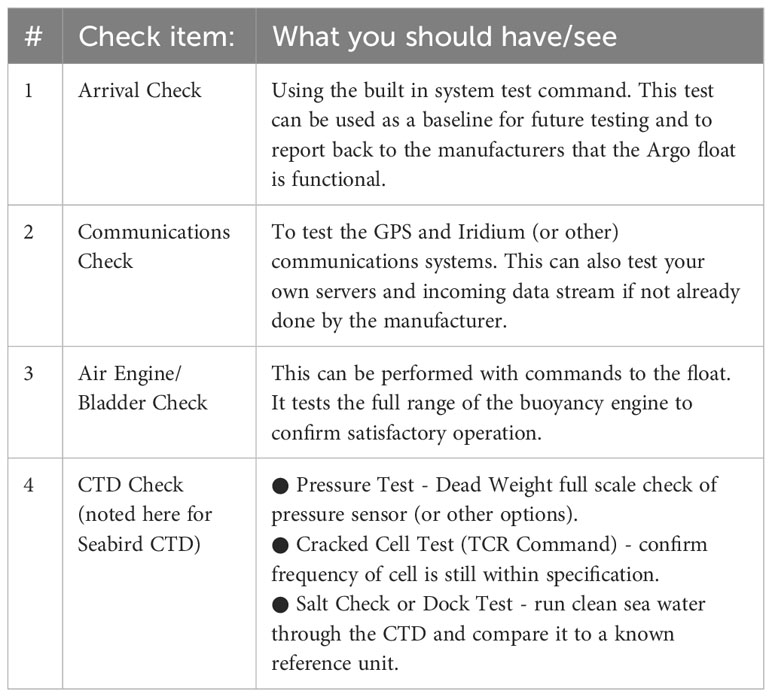
Table 2 Suggested checklist for clients checking the functionality of Core Argo floats received. Each Argo float manufacturer will be able to guide on how to undertake these tests as they will be specific to the Argo float. Please refer to their operational manuals. The description below is by way of explanation only.
The user will have to connect a computer to the Argo float and send commands to perform operations. It is assumed that the user has prior knowledge for these tasks and/or be guided by the float manufacturer for assistance.
Perform the checks detailed in Table 2 to confirm the Argo float will be fully functional when deployed. This may capture potential faults. It is recommended that this is performed as soon as practical after receiving the floats at the user facilities from the manufacturers.
3 Shipment and storage of Core Argo floats
3.1 Shipping and handling
The user is reminded of Section 2.1.2 on Transportation of Core Argo floats in conjunction with the next two subsections.
The most critical physical handling concerns for Core Argo floats are listed below:
● Do not grab or bump the sensor head or antenna. The sensor head and antenna are not designed to hold the weight of the Argo float and can easily be damaged. Pick up and move the Argo float by the aluminum hull and/or the stability disk/collar.
● Do not drop the Argo float and generally handle it with care.
● Avoid scratching the hull as this could decrease the integrity of the hull by increasing the chances of corrosion.
● It is suggested that a specialized trolley be used to move the Argo floats around as opposed to carrying them, where possible.
Argo Floats contain battery packs of lithium or electrochemical (alkaline) batteries. There are differing regulations in terms of shipping, depending on the type of battery installed.
● Lithium batteries: The International Air Transport Association (IATA) Dangerous Goods Regulations (DGR) must be followed when transporting lithium metal or lithium-ion batteries by air. The shipping containers or boxes must be correctly marked, labeled, and certified in accordance with IATA DGR for Class 9 Miscellaneous Dangerous Goods. All lithium metal and lithium-ion cells and batteries are only possible on airfreight or non-passenger aircraft to, over, and from the United States. Please check your country’s regulations.
● Alkaline batteries: There exists a small risk for alkaline cells within battery packs powering Argo floats, to emit a combustible gas mixture. When exposed to air, these gasses easily dissipate to a safe level. However, building up within the hull of an Argo float can pose problems. One solution to mitigate against this, developed by the manufacturer of the Apex Argo float, is to add a catalyst which allows the recombination of hydrogen gas to oxygen, forming H2O. The instrument is also designed to relieve internal pressure through the upper end cape release (Teledyne Webb, 2010).
3.2 Core Argo float storage
Core Argo floats are delicate instruments and require suitable storage. Below are short descriptions given for each Core Argo float from their relevant manufacturers where available.
● APEX (and APEX-UW): For optimum battery life, APEX Argo floats should be stored in a controlled environment in which the ambient temperature is restricted to the range +10°C to +25°C.
● ARVOR and PROVOR: These Argo floats operate in a temperature range of -20 to +50°C. The suggested storage time before expiry is one year.
● NAVIS: Avoid exposing Argo NAVIS floats to high temperatures during shipping, storage, and handling.
● ALTO, SOLO-II and S2A: It is best to store these Argo floats vertically cushioned with foam. These Argo floats are much more robust against impact when oriented vertically. This is especially important on smaller boats. The boxes use water soluble tape to keep the box closed and this is protected by a bag. But it is best to prevent the package from getting wet. Also, these Argo floats should be kept out of direct sunlight, as sunlight on the bag could cause condensation on the inside of the bag which could compromise the water-soluble tape.
The sensitivity of the CTD sensors should also be considered when storing Argo floats, especially where conditions in storerooms or onboard vessels are likely to become extreme (very warm or very cold). Argo floats equipped with a SBE41/SBE41CP CTD should be stored and shipped above freezing and less than 45°C (Seabird, 2017). Argo floats equipped with a RBR CTD can be stored and shipped between -40°C to 70°C (pers comm., RBR, 2022).
4 Setup of Core Argo floats
This section is related to the final checks and initiation of Core Argo floats prior to their deployment. All Argo floats need to be started outside, with a clear view of the sky, and in the vertical position with the water release end down on the ground. This is so the GPS positioning and satellites communications can be tested before deployment.
4.1 S2A/ALTO/SOLO-II
● The S2A or ALTO Argo floats can be started with a magnet prior to being loaded onto a vessel, and up to 180 days prior to deployment. It is helpful if this procedure is undertaken in a relatively quiet environment, so the pump initializing can be heard at the time of the magnet swipe. Please communicate with the float operator before starting up the Argo float.
● Cut a flap in the outer plastic bag and the shrink wrap to expose the RESET window that is cut into the box. Open the reset flaps on the box to show a section of the Argo float. Find the RESET decal on the pressure case. If it cannot be found, reach in and gently rotate the Argo float until it is accessible.
● Using the magnet, swipe it vertically once over the RESET label, making sure the magnet swipe extends beyond the label. If started successfully, the pump should be heard running immediately. If the pump is not heard running after 60 seconds, re-swipe the magnet until the pump is engaged. Once engaged the pump will run for 7-15 minutes and a self-diagnostic Built In Test (BIST) will be initiated. A portion of the test includes obtaining GPS position and offloading test messages to verify communications with the Iridium system.
● The instrument will send the results of the BIST to the float operator via Iridium satellite network, and this may take up to an hour to receive. The S2A or ALTO Argo float should NOT be deployed until the float operator confirms that the startup BIST messages have been sent and that the Argo float has indicated that it is ready to be deployed. If a complete startup message is not received, the float operator will request the Argo float be re-swiped.
● Once the float operator has confirmed a complete startup BIST message, the plastic flap can be taped shut and the float stored back inside.
● A video of how-to startup an ATLO/S2A/SOLO-II can be found at https://argo.whoi.edu/argo/deployment/WHOI_Argo_startup.mp4.
4.2 APEX and NAVIS
● APEX and NAVIS Argo floats can be deployed in two ways. Either activated before deployment with a magnet swipe over the hull in a designated point, or using a computer connected to the Argo float. The second option for deployment can be pressure activation after the Argo float has descended past 25 db.
● If activated on deck with a magnet swipe, then onshore team members can confirm the Argo float has started and has passed its self-test. Alternatively, a computer can be connected to the Argo float to initiate activation and monitor the mission prelude phase before deployment.
● Pressure activation is a good method if the deployment vessel is a ship of opportunity and therefore has limited time for the deployment due to other operations onboard, or limited capacity in terms of deployment teams.
4.3 HM2000
● HM2000 Argo floats need to be started outdoors with a clear view of the sky. These Argo floats can be activated with the magnet at the location of “activation”. If the HM2000 Argo float uses the BDS satellite system for data transmission, the operator must wait for a permission for deployment from the land-based stations, because the Argo float will return its test messages to the land via BDS.
4.4 ARVOR/PROVOR
● ARVOR Floats need to be armed (ARMED ON) prior to deployment. This is generally done at factory level or before shipping the instrument.
● These Argo floats have a magnet fixed to the hull which needs to be removed for activation of the Argo float. They need to be started outside, with a clear view of the sky, and in the vertical position. This is so the GPS positioning and Iridium satellites communications can be tested during its self-test.
● After removal of the magnet, the ARVOR Argo float undergoes a self-test of all its elements (CTD, hydraulic, internal vacuum, Iridium and GPS). This test lasts for about three to five minutes and will activate a buzzer and send an SBD Iridium message upon completion. The buzzer acts as the “ready to deploy” signal and will last for 30 minutes during which the Argo float may be deployed. At any time, the magnet may be put back on its position on the hull if for any reason the deployment has to be canceled.
● If the buzzer does not activate after 5 minutes, it is advised to restart the Argo float by putting back and removing the magnet again. After 3 failed attempts, the float should not be deployed, and advice should be sought from NKE.
● Alternatively, the Argo float can be in ARMED ON mode, and have a magnet fitted with water soluble tape. This method can be used for ships of opportunity deployments where deployment expertise is minimal. It is like pressure activation mode. ARVOR Argo floats may also be delivered without a magnet and set into pressure activation mode. It will then start its mission as soon as a pressure is detected by the CTD. Those two configurations are not however the default mode for ARVOR Argo floats, and the buzzer activation should be the preferred method considering that it should not take more than 5 minutes.
5 Deployment of Core Argo floats
Most Core Argo float deployment techniques require the ship to be moving between 0.5 - 2 knots and the deployment to take place on the leeward side of the vessel. All these deployment instructions assume that the Core Argo float has been confirmed to have been initiated. There are several deployment videos listed in Table 3 which we suggest users watch and perhaps make use of in their operations.
5.1 Box with water release (S2A/ALTO/SOLO-II)
These Argo floats are deployed inside a biodegradable cardboard box held together with water soluble tape or release harness. The box protects the delicate parts of the Argo float from impact during deployment.
● Remove the outer plastic sleeve, plastic wrap, and the cardboard that protects the water release. Keep the area where you are working dry as exposure to water will prematurely trigger the water-soluble release mechanism.
● The water release is a metal or plastic cylinder on the heavy end of the box, it may be wrapped in plastic, remove the plastic wrap. If the water release was activated and released its line, follow the instructions below to replace the water release.
● Some boxes may have a backup line that secures the harness in case the water release is triggered accidentally. Usually, this line is red. If there is a backup line it must be cut before deploying or the harness will not release.
● If a carabiner is provided, pass the loops of the bridle through it and secure one end of the deployment line to the carabiner using a bowline knot. If no carabiner is provided, pass the deployment line through each of the 4 loops and secure it with a bowline knot. Secure the other end of the deployment line to the ship.
● With the ship underway at ~0.5 - 2 knots, deploy the instrument over the side preferably on the leeward side. With one person keeping tension on the deployment line, have one to two others lift the heavy end over the side. Gently lower the box to the water level being careful to not hit the box against the side of the ship or impact the water too hard (Figure 1). Continue lowering smoothly until the bottom of the box is in contact with the water. You can dunk the box like a tea bag to help keep the box up right. When the release mechanism gets wet, the starch ring will dissolve, and it will release the box from the bridle and the entire box will slip away. The box is sealed with water-soluble tape and is biodegradable. The water release should activate within one minute of touching the water. All parts of the harness and water release will be retrieved with the lowering line.
● Please save the deployment supplies. Rinse the water releases and save them along with the harnesses, deployment line, and carabiner for return to the Argo team. These supplies are custom made and returning them allows for re-use.
● Complete the metadata sheet with the appropriate serial number and record the deployment information together with any notes about deployment problems, bad weather or any other pertinent observations (see the example metadata sheet in Figure 2).
● Never stand the box on its light end, or the antenna could be damaged. Keep the Argo floats horizontal or secured vertically on the heavy end until deploying.
● A video of float deployment using a water release can be found at https://argo.whoi.edu/argo/deployment/WHOI_Argo_deployment_water_release.mp4.
● In the unlikely event that the water release mechanism has released prematurely, you can replace the cornstarch collar, yellow piece shown in Figure 3. (Note: Sometimes the cornstarch collar is red.) The aluminum release mechanism can be unscrewed, and the cornstarch collar replaced. The cornstarch collar is a plastic cylinder with a solid ring of yellow (or red) on one end and a ring of fingers that leaves the white starch ring visible on the other end. The fingered ends should be closest to the spring mechanism. Insert the pointed end of the shear pin into the spring. Place the opposite end of the shear pin into the top of the starch collar. Thread on the housing to complete assembly. To hold the harness around the box, a length of line with loops on each end or a looped line is provided. The line is threaded through each of the four looped ends of the harness straps at the heavy end of the box. The loops on the water release line are captured over the shear pin of the water release as it is screwed into the housing. See another rigged box for an example of how the harness is rigged with the water release.
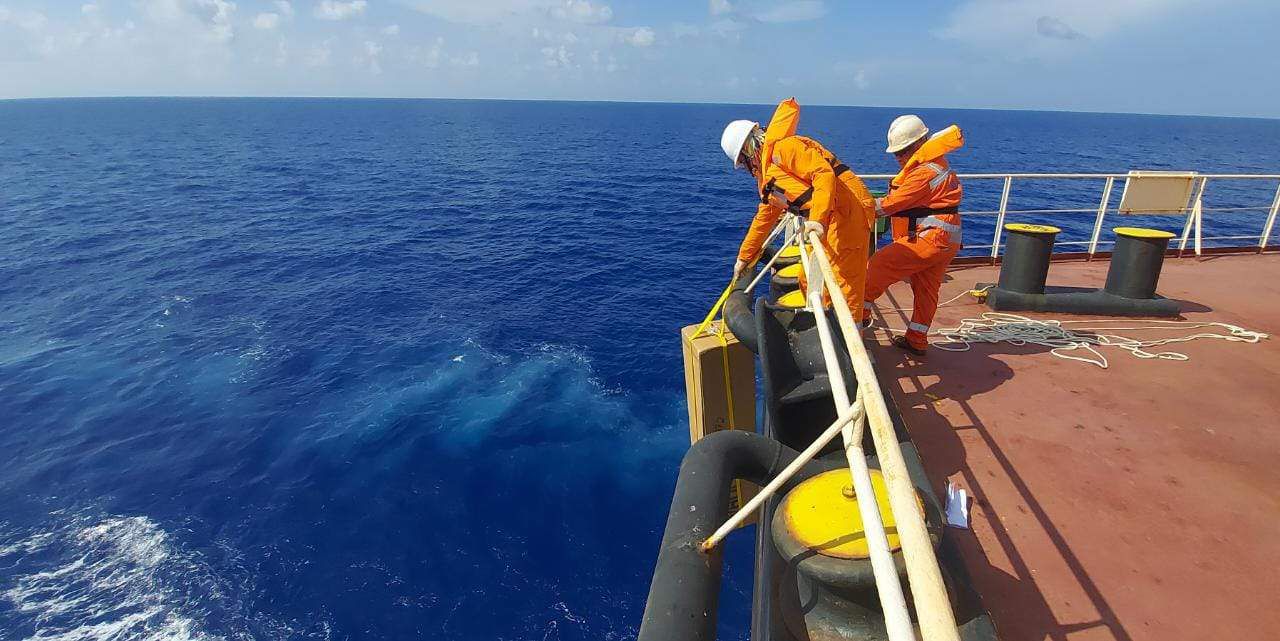
Figure 1 Deployment of the Argo float within a box over the side of the vessel (Photo: WHOI).
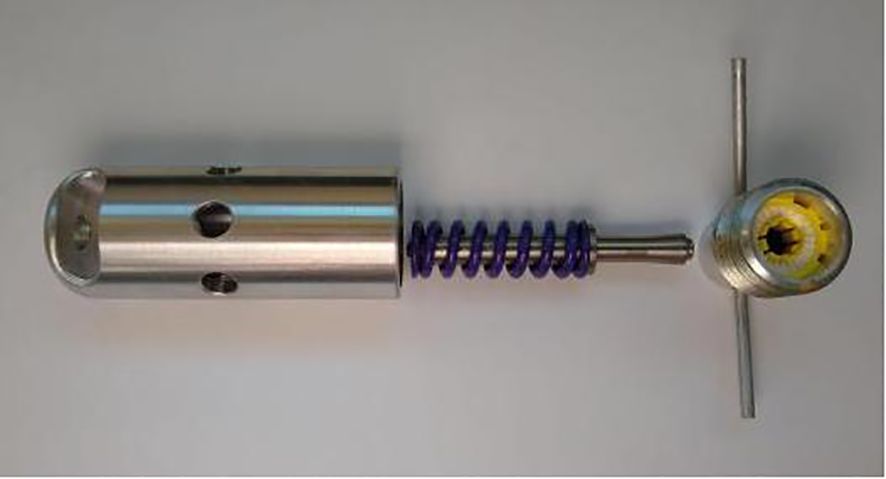
Figure 2 Water release used for boxed Argo float releases.
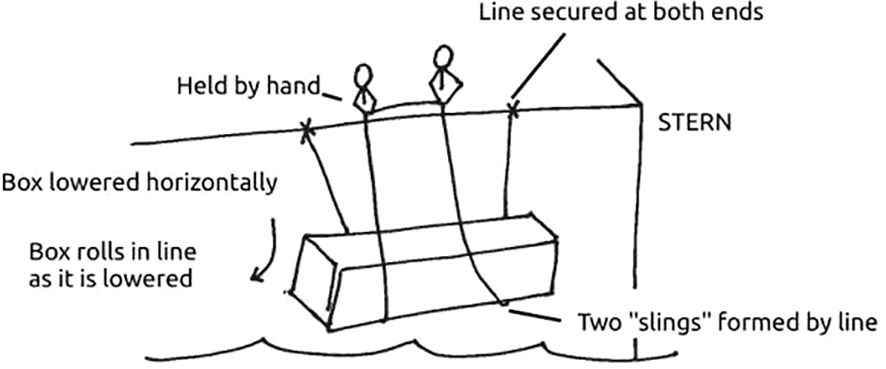
Figure 3 Schematic of Argo float box release using a sling (Schematic: Scripps Institute of Oceanography).
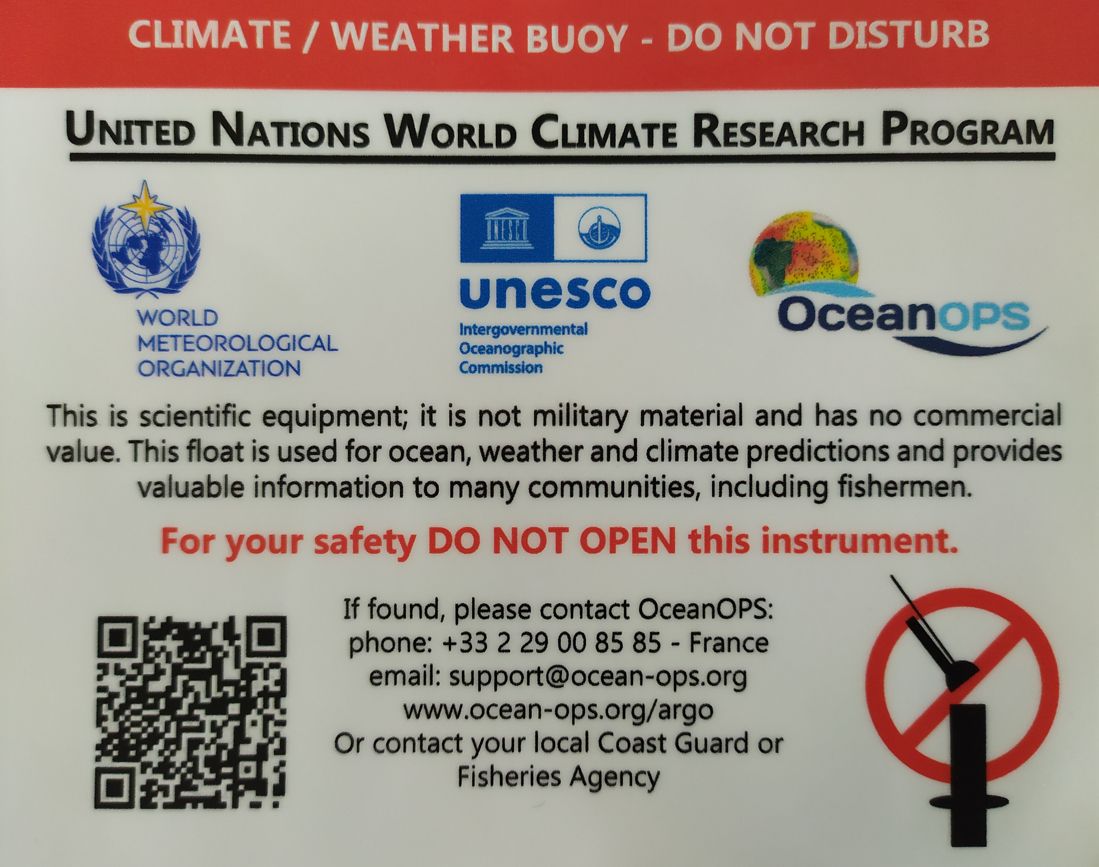
Figure 4 Sticker placed on every Argo float to warn against opening the float and how to find additional information. Please note the email address and url have changed to support@ocean-ops.org and http://argo.ucsd.edu respectively. Reprinted with permission from OceanOPS.
5.2 Box without water release - sling method (S2A/ALTO/SOLO-II)
This method is much the same as the box with water release method but uses two slings to lower the Argo float (Figure 4). The method was developed by Christopher Berg and Kyle Grindley of SIO. It is advised that this method be used by research vessel teams, whereas the water release method is ideal for ships of opportunity.
● If the boxed Argo float is inside a bag, remove the plastic first, taking care not to cut the two PVA tape bands around the box.
● Remove the plastic packing tape from the ends of the box. The packing tape is the only link holding the ends of the box closed during shipment. It must be removed from the box before deploying or the Argo float will not release properly from the box. After removing the packing tape, be careful not to let the Argo float slip out of the box’s unsecured ends.
● Rig the deployment line. Deploy the instrument over the side at the aft port or starboard quarter of the ship, preferably the leeward side (Figure 4). Use a length of line at least 4 times the distance from the top of the rail to the waterline. Secure both ends of the line to the rail ~2-3 ft (0.6 - 1 m) apart. If possible, open the railing gate or safety lines so the box can be lowered from deck level.
● Start lowering the box over the rail. With one person holding each end of the line about 1.5 m inside of each secured end, the line should form two “slings”. Hold the Argo float horizontally, manoeuvre it over the rail so that it is supported by the “slings”.
● Lower the box over the side and into the water. The ship should be underway at ~1 knot. Do not deploy when stationary or drifting to avoid a collision with the instrument. Slowly and evenly pay out the line so that the Argo float is lowered down the side. It should roll as the line is paid out. Once the box is in the water, release the center of the line into the water, tossing it so it clears the box to avoid tangles.
● An mp4 video of the sling deployment can be found here (https://sio-argo.ucsd.edu/dplyprocedures.html).
● A video of float deployment using the sling/roll method can be found at https://argo.whoi.edu/argo/deployment/WHOI_Argo_deployment_roll.mp4.
5.3 Unboxed lowered (NAVIS/APEX/ARVOR)
Rope method: Deploy the Argo float on the leeward side of the vessel, to avoid bumping the vessel, with the ship moving between 0.5 and 2 knots. This method has been adapted from Teledyne Webb (2010).
● Remove the plugs from the CTD inlet (if the Argo float is fitted with a SBE41 CTD) and outlets.
● Pass a rope through the hole in the plastic damper plate. The rope should fit easily through the hole and be capable of supporting 50 kg. Pass the rope down through the hole.
● Holding both ends of the rope bight, carefully lower the Argo float into the water. The damper plate is amply strong enough to support the weight of the Argo float. However, do not let the rope slide rapidly through the hole as this may cut the plastic disk and release the Argo float prematurely.
● Take care to not damage the CTD or the Iridium antenna against the side of the ship while lowering the Argo float.
● Do not leave the rope with the instrument. Once the float is in the water, let go of the lower end of the rope and pull on the top end slowly and carefully until the rope clears the hole and the Argo float is released.
● It may take several minutes for the cowling protecting the bladder to fully flood with water and the Argo float may drift at an angle or even rest on its side during this period. This is normal behavior and not a cause for concern.
Quick-release hook method
The method noted above is almost the same as that that would be employed using a quick-release hook. The only difference would be to attach the rope through the quick release hook as opposed through the Argo float damper plate.
5.4 Unboxed by hand (ARVOR)
The ARVOR Argo float can be launched by hand from the deck on the leeward side from a maximum height of 2 m, with the ship moving forward between 0.5 - 2 knots.
● Remove the plugs from the CTD inlet and outlets (if the Argo float is fitted with a SBE41 CTD).
● Hold the ARVOR Argo float by the damper plate being careful of the ARVOR Argo float’s antennae and CTD and simply drop it over the side of the ship.
5.5 Deployment videos and resources
Additional resources for the deployment of Core Argo floats, deployment manuals and resources are available in Table 3.
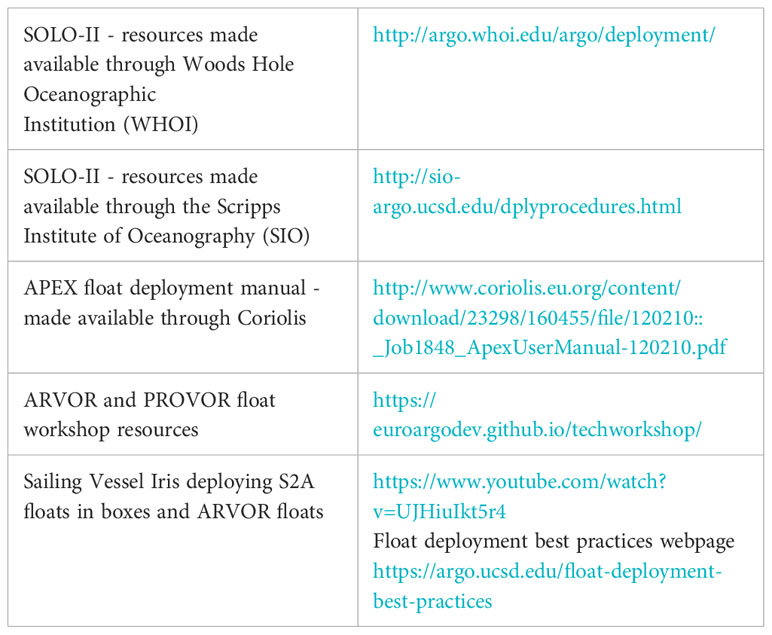
Table 3 Deployment video examples and deployment resources organized by Argo float type.
6 Beached Argo floats
If an Argo float washes ashore or is beached, it is the responsibility of the deploying institution to arrange for its safe disposal. This is to secure the safety of the public and the environment. A sticker (Figure 5) is attached to all Argo floats to warn against opening the float and to facilitate the float’s identification and provide the public with contact information (via OceanOPS) to find the float ‘owner’. Safe disposal usually entails removing the batteries for local disposal as hazardous waste or shipping the float back to the originating laboratory for disassembly. Since the use of high-bandwidth communication systems, and thus shorter surface times, grounding rates have markedly decreased, but this responsibility remains in place.
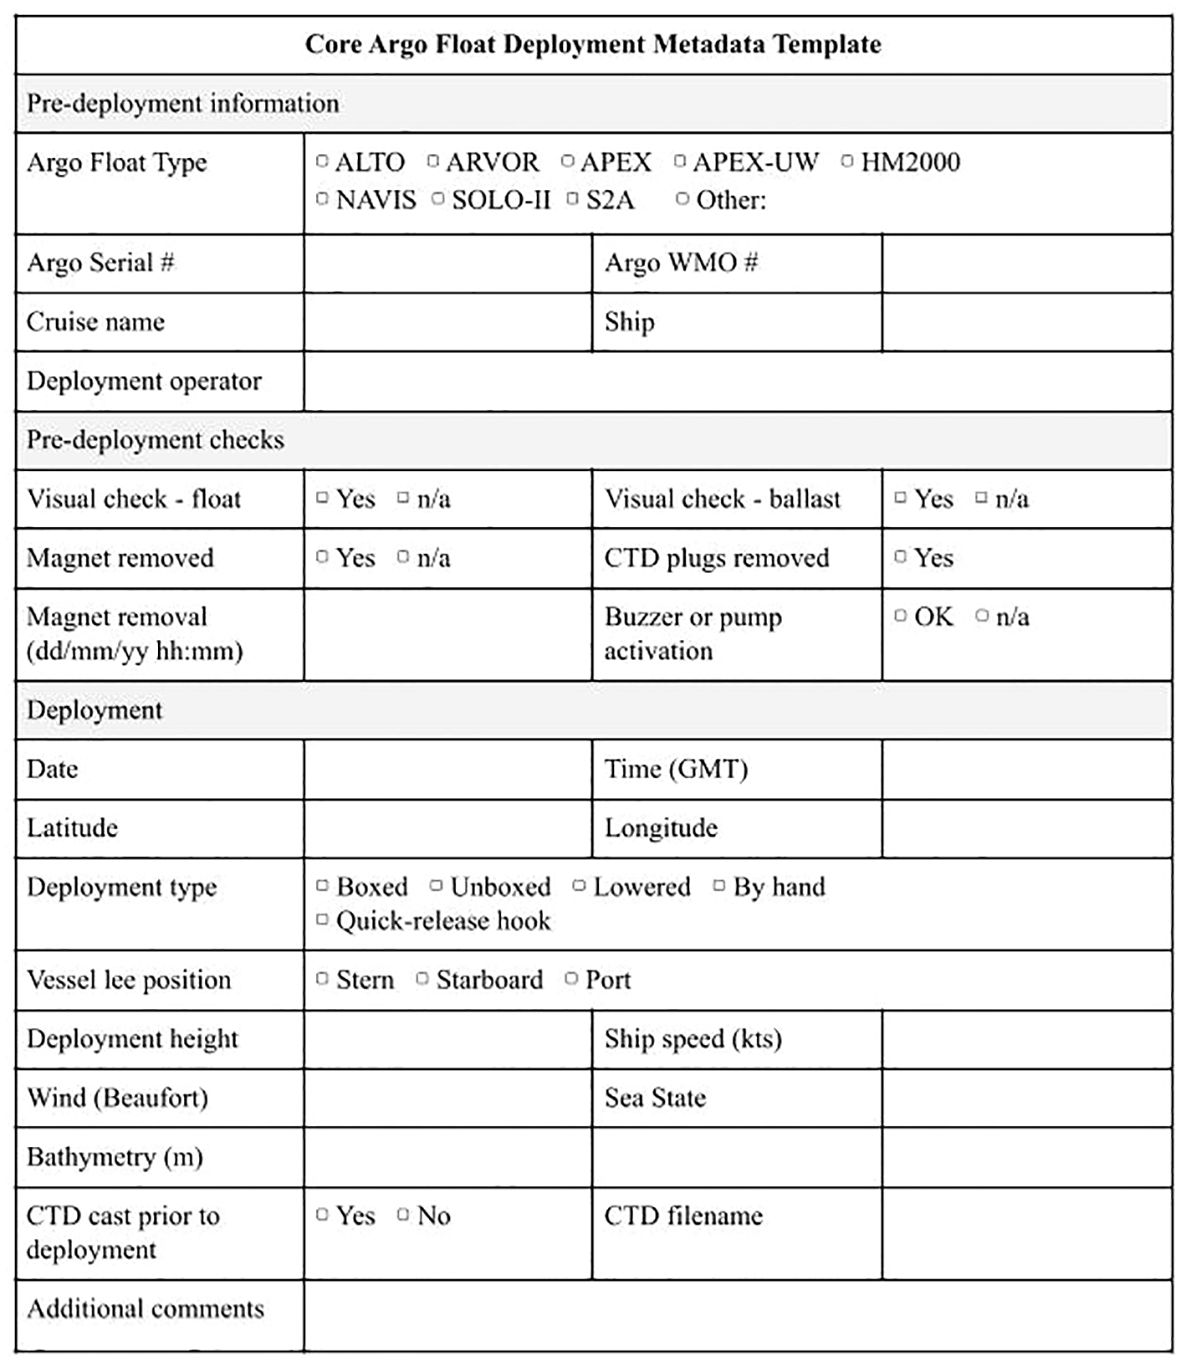
Figure 5 Metadata deployment sheet template.
7 Metadata
Metadata are crucial for understanding the Argo dataset, monitoring it and helping preserve it over time. Including lots of metadata associated with float deployments has helped Argo quality control experts identify systematic problems with data from different sensors. Metadata is also used to help inform users of subtleties of sensor sampling and resolution and allows for easy categorization of the dataset.
A template of the metadata required is given in Figure 2. This template has been designed specifically for Core Argo floats and covers all parameters required for notifying the float on OceanOps, but also for processing of the data.
Recently, the Argo Program has converted almost all its reference tables for metadata to standardized vocabularies that are both machine readable and human readable. These are maintained by the Natural Environment Research Centre (NERC) Vocabulary Server (NVS) at the British Oceanographic Data Centre (BODC). The collection of Argo reference tables can be found here: NVS Search (nerc.ac.uk). All the Argo reference tables begin with ‘R’ and will also be linked from the Argo User Manual. This ADMT webpage explains how to access the NVS to find Argo vocabularies and also includes links for all the available reference tables: Argo vocabulary server - Argo Data Management (argodatamgt.org).
Metadata contents and format are checked by the Argo File Checker (euroargodev/ArgoNetCDF: Argo NetCDF format and content (github.com)) prior to inclusion on the Argo data servers and the NVS version of the Argo reference tables makes this process less likely for error given the ability to query accepted metadata values by machine rather than by human input.
OceanOPS also monitors Core Argo metadata, especially those collected at deployment. This is important because Argo must follow IOC XX-6 (https://argo.ucsd.edu/international-oceanographic-commission-argo/) which calls for notification when Core Argo floats drift into countries EEZs (please refer to the EEZ section for further information). It is imperative that the Argo Program follow the IOC resolutions to maintain its good standing within the international community which allows for Core Argo floats to make and freely distribute these measurements, even in EEZs, with the country’s permission. All Core Argo floats deployed must be registered at OceanOPS prior to deployment.
It is strongly advised that the IMEI number of the Argo float is NOT PUBLISHED on any websites or portals. Argo floats can be interrogated through telecommunications with this number and Argo teams are advised to keep these secure and for use only by the Argo float operators.
Argo data is open and freely available to all users, be they scientists, students, operational forecast centers, and so forth. As stated in Part 1 of the Core Argo Best Practices, in order for the OneArgo Program to be a recognized Global Ocean Observing System (GOOS) network, all data and metadata acquired has to follow FAIR data principles - Findable, Accessible, Interoperable and Reusable. More information regarding the OneArgo data management system and how to access and cite Argo data are available in Part 1 of the Core Argo Best Practices.
Author contributions
TM: Writing – review & editing, Writing – original draft. MS: Writing – review & editing, Writing – original draft. DW: Writing – review & editing, Writing – original draft. CG: Writing – review & editing, Writing – original draft. NP: Writing – review & editing, Writing – original draft. TU: Writing – review & editing, Writing – original draft. CH: Writing – review & editing, Writing – original draft. SD: Writing – review & editing. LT: Writing – review & editing. VT: Writing – review & editing. ZL: Writing – review & editing. BO: Writing – review & editing.
Funding
The author(s) declare financial support funding was received for the research, authorship, and/or publication of this article. The OneArgo Program is funded from country contributions in the form of procurement of Argo floats for deployment in the global array, deployment of Argo floats in difficult to reach places on behalf of countries, data management of float data, and the financial support of the OceanOPS team for the technical assistance.
Acknowledgments
We would like to acknowledge Christopher Berg, Michael Cassen, and Kyle Grindley of Scripps Institution of Oceanography for the video and directions of deploying a Core Argo float using the sling method. We would also like to thank the Argo Steering Team (AST) and Argo Data Management Team (ADMT) for taking the time to review this best practice for the community. The document was community reviewed by thirteen members, and the co-chairs, of the Argo Steering and Argo Data Management Teams. All comments and changes were used to improve the document. The Core Argo Best Practice was GOOS endorsed in October 2023 (DOI: 10.25607/OBP-1967).
Conflict of interest
The authors declare that the research was conducted in the absence of any commercial or financial relationships that could be construed as a potential conflict of interest.
The author(s) declared that they were an editorial board member of Frontiers, at the time of submission. This had no impact on the peer review process and the final decision.
Publisher’s note
All claims expressed in this article are solely those of the authors and do not necessarily represent those of their affiliated organizations, or those of the publisher, the editors and the reviewers. Any product that may be evaluated in this article, or claim that may be made by its manufacturer, is not guaranteed or endorsed by the publisher.
References
Izawa K., Mizuno K., Miyazaki M., Inoue A., Ando K., Takatsuki Y., et al. (2001). On the weight adjustment of profiling floats. Japan Mar. Sci. Technol. Center Yokosuka Japan ARGO Tech. Rep. FY2001 5), 18–35.
Sea-Bird Scientific (2017). Best Practices for Shipping and Deploying Profiling Floats with SBE41/41CP (Bellevue, WA: Sea-Bird Scientific), 7. ppApplication Note, 97. doi: 10.25607/OBP-47
Teledyne Webb (2010) Apex Profiler User Manual. Available online at: https://www.coriolis.eu.org/content/download/23293/160430/file/030410::_Job1704_ApexUserManual_APF9I_030410%20(2).pdf.
Keywords: Core Argo float, best practice, physical handling, deployment, metadata
Citation: Morris T, Scanderbeg M, West-Mack D, Gourcuff C, Poffa N, Udaya Bhaskar TVS, Hanstein C, Diggs S, Talley L, Turpin V, Liu Z and Owens B (2024) Best practices for Core Argo floats - Part 2: physical handling, deployment and metadata considerations. Front. Mar. Sci. 11:1358048. doi: 10.3389/fmars.2024.1358048
Received: 19 December 2023; Accepted: 04 March 2024;
Published: 03 April 2024.
Edited by:
Jay S. Pearlman, Institute of Electrical and Electronics Engineers, FranceReviewed by:
Antonio Novellino, ETT SpA, ItalyJohn Roland Moisan, National Aeronautics and Space Administration (NASA), United States
Copyright © 2024 Morris, Scanderbeg, West-Mack, Gourcuff, Poffa, Udaya Bhaskar, Hanstein, Diggs, Talley, Turpin, Liu and Owens. This is an open-access article distributed under the terms of the Creative Commons Attribution License (CC BY). The use, distribution or reproduction in other forums is permitted, provided the original author(s) and the copyright owner(s) are credited and that the original publication in this journal is cited, in accordance with accepted academic practice. No use, distribution or reproduction is permitted which does not comply with these terms.
*Correspondence: Tamaryn Morris, t.morris@saeon.nrf.ac.za