-

Qualtrics Platform -

Customer Journey Optimizer -

XM Discover -

Qualtrics Social Connect
Survey Tab Basic Overview
About the Survey Builder
Surveys are created and edited in the survey builder.
From the Projects page, open the Survey tab in any one of three ways:
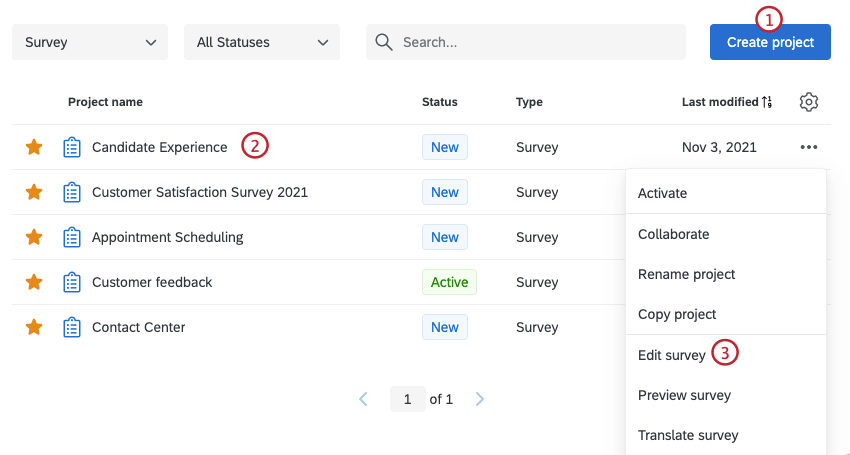
- Choose Create project; after following the steps, you’ll be taken to the Survey tab of your new project.
- Click on any existing project to be taken to that project’s Survey tab.
- Pick Edit survey from the actions dropdown menu.
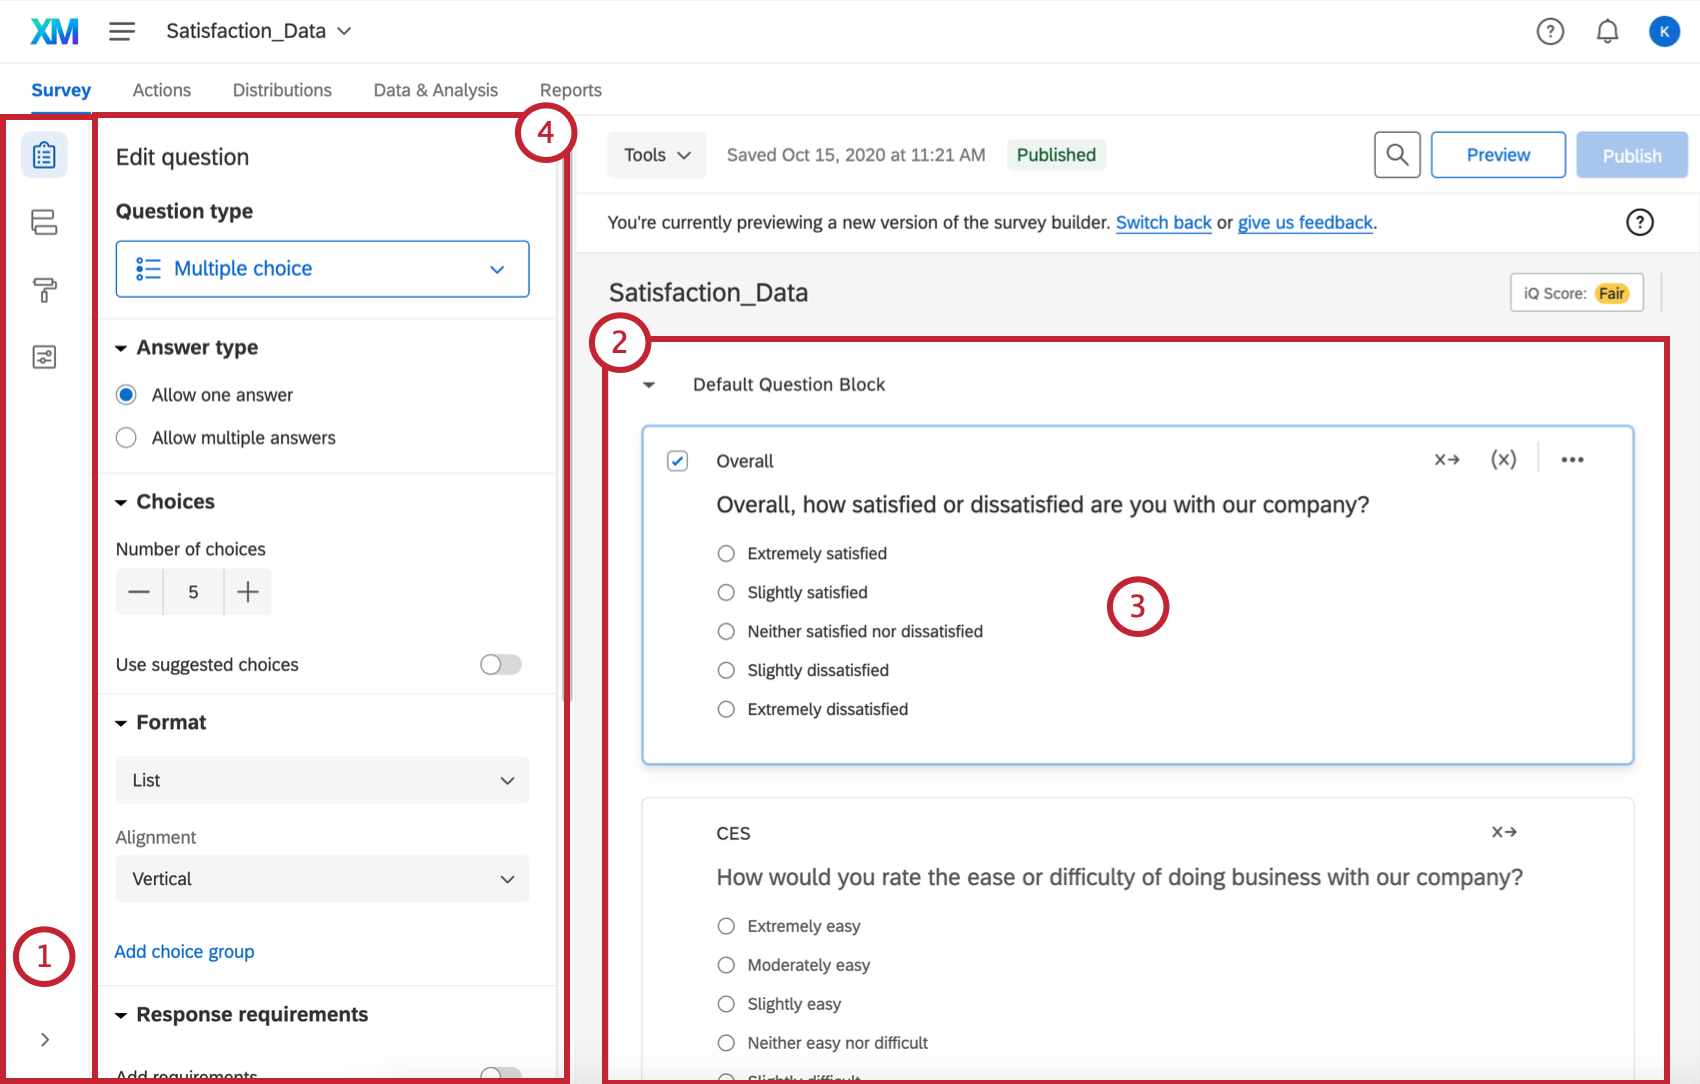
As the Survey tab opens, you’ll the see the survey builder’s most prominent features:
Block Basics
All survey questions are created, edited, and stored inside blocks. Every survey includes at least one block initially called the “Default Question Block.”
4 elements appear in every block:
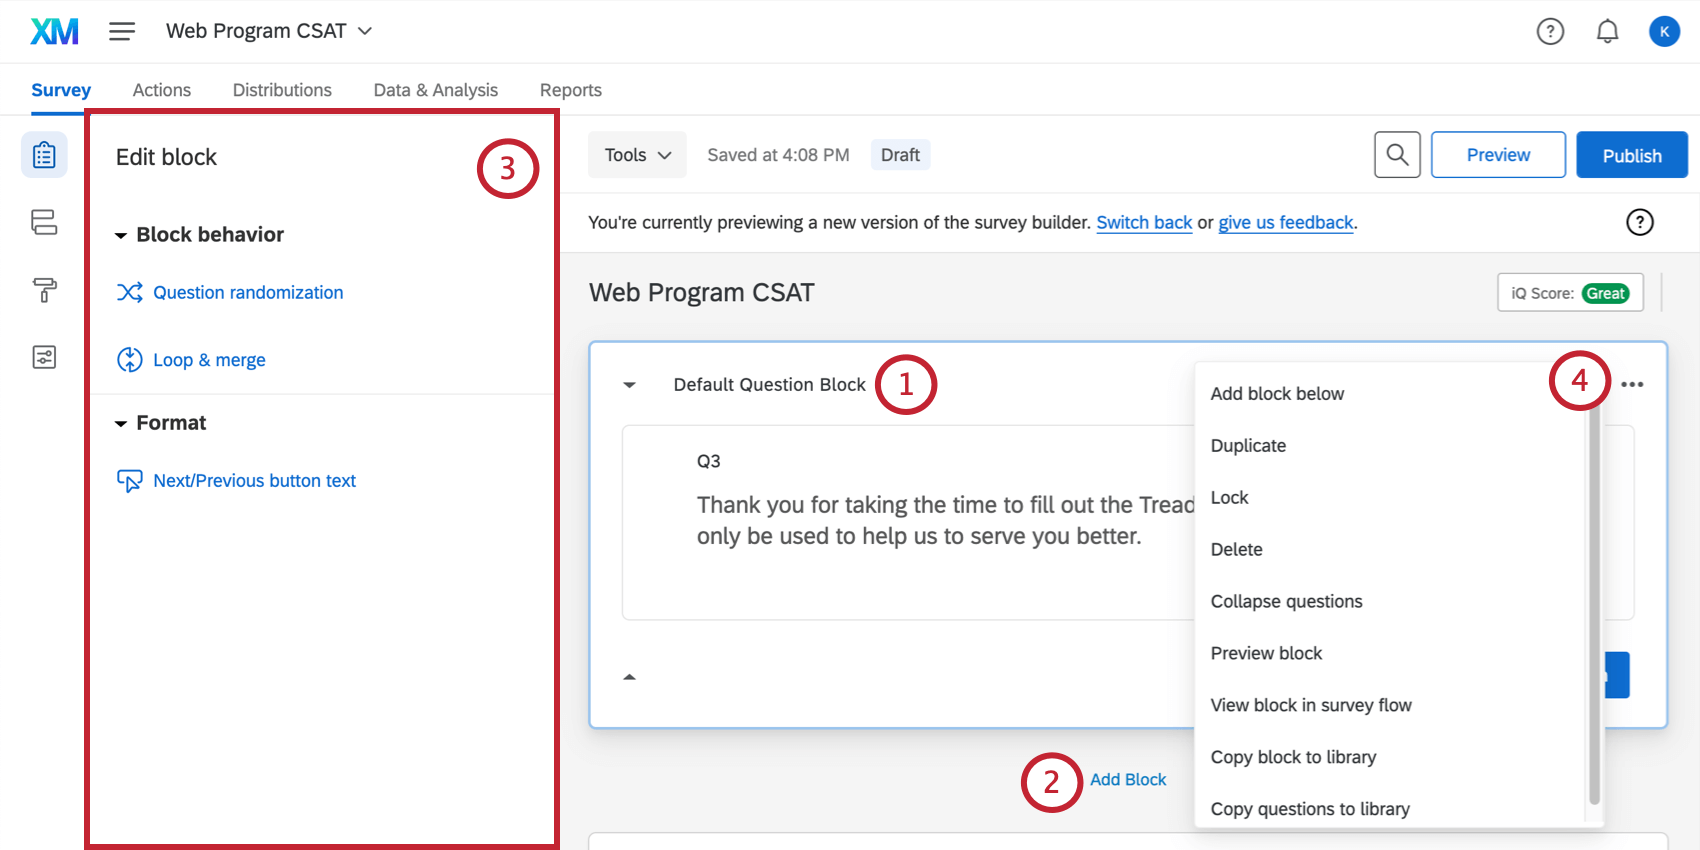
- Block name: Change at any time by clicking directly on the name and typing a new one.
- Add Block: Lets you create new blocks.
- Block editing pane: Appears when you click the block (e.g., white space next to the name) without clicking a question. Make changes to block behavior and formatting. Includes question randomization, loop & merge, and the ability to edit Next / Previous button text.
- Block options menu: Displays an list of one-click block editing choices. See the linked page for more information about each option.
Blocks are best understood with a couple of examples:
- Many surveys start with an initial “Demographics” block that directs different respondents (e.g., male/female, younger/older, education, etc.) to distinct survey question blocks that precisely target their needs.
- An application of multiple blocks is shown in the image below where a starting demographic block collects first and last names. In the following blocks, the names can be recycled to address respondents by their names with the use of embedded data logic. The names entered can also be used to generate or update contact lists.
- Additionally, you could channel the various demographics down different survey pathways (i.e., one path for men and another for women) with branch logic.
- You can opt certain respondents out of the survey based on quotas achieved for a specific demographic (i.e., quotas based on age, gender, or income level).
- Finally, you could display different survey endings to different demographic groups.
Let’s look a little deeper:
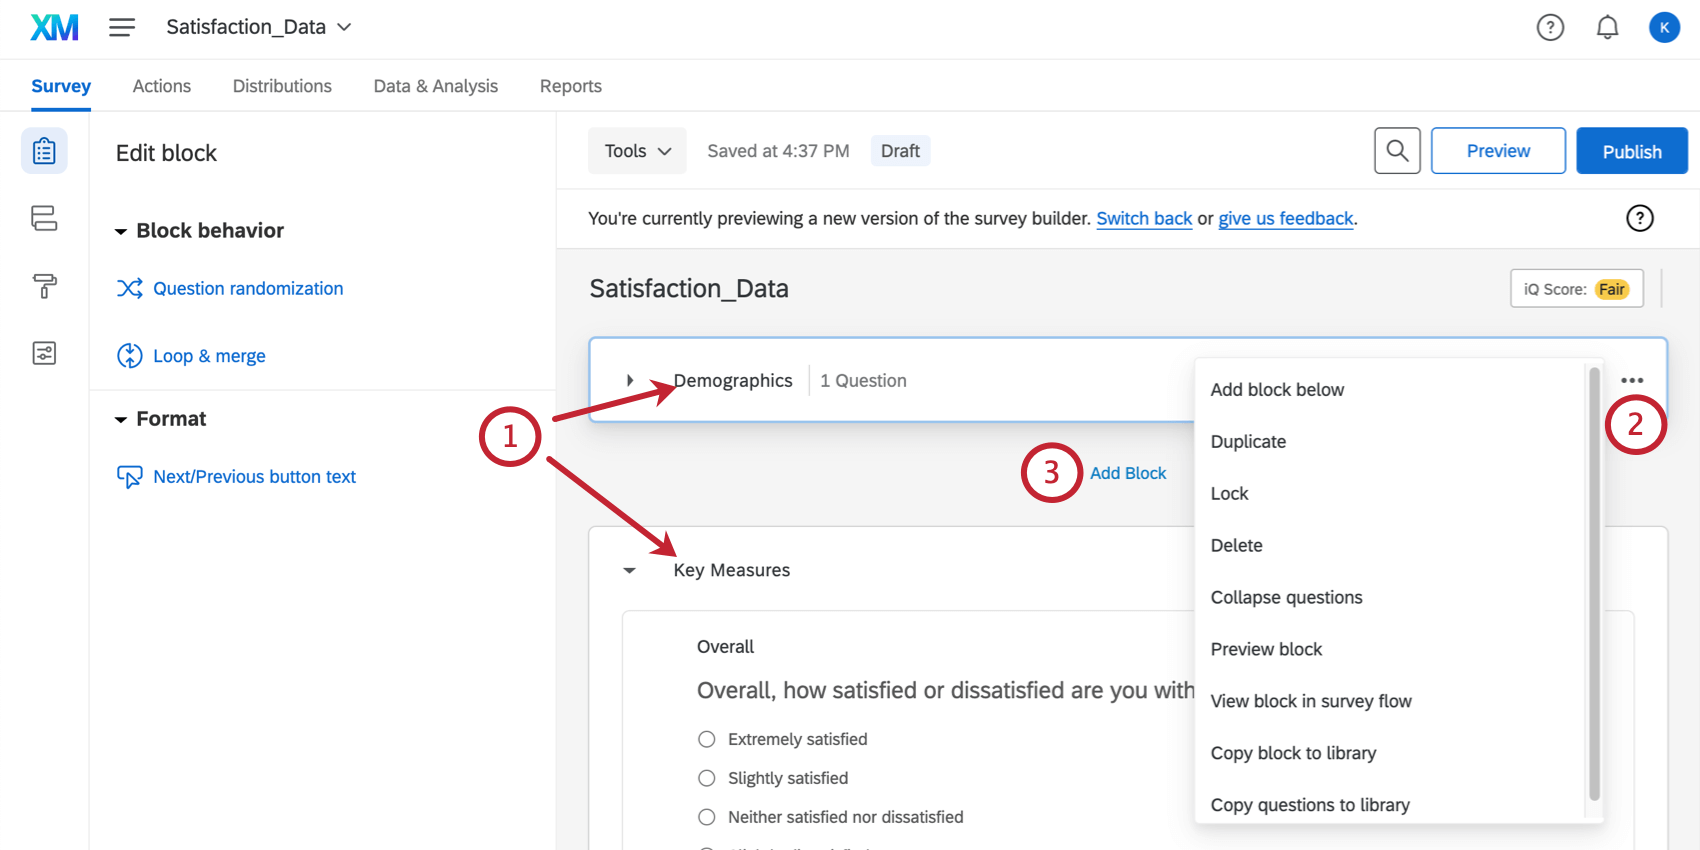
- A second block (Key Measures) appears below a renamed Default Question Block (now called the Demographics Block).
- The block options menu reveals block-level commands, such as collapse questions (which shrinks a block’s questions for easier viewing, such as we’ve done with the Demographics block).
- Blocks are separated by a spacer (which includes a handy Add Block command).
For simple surveys, placing all of your questions in a single block is just fine. But as surveys become more intricate, organizing questions into multiple blocks allows the application of a sophisticated survey flow, including branches, randomization, authentication, and embedded data.
Visit the Displaying Blocks page to learn how to take full advantage of blocks in building sophisticated survey flows.
Question & Editing Pane Basics
Initially, a default multiple-choice question will be inserted into your “Default Question Block.” This ensures that your block has at least one question to start with.
- To add additional questions to a block, click Add new question.
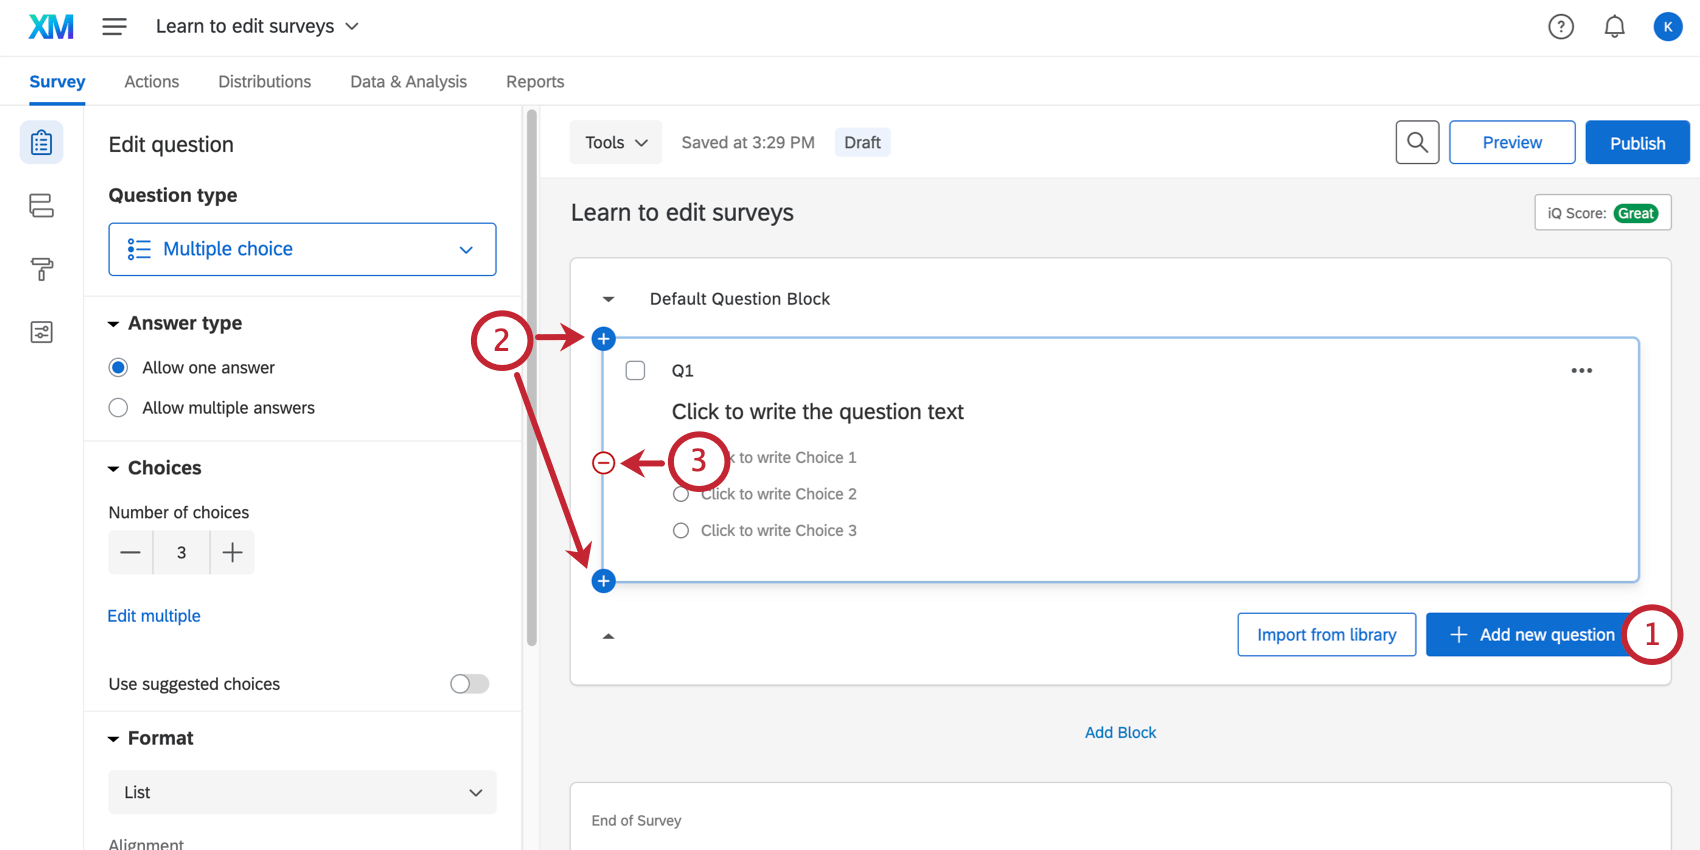
- To add more questions, hover over any existing question and click the plus (+) buttons (either above or below the existing question depending on where you want to add the question).
- Click the minus (–) sign to delete a question.
Qtip: You can recover deleted questions from the trash at the bottom of the survey. See the Deleting Questions section for more details.
- Move questions around the survey by clicking and dragging them. The question you move will be highlighted in blue, and where it lands is represented by a blue line in the editor.
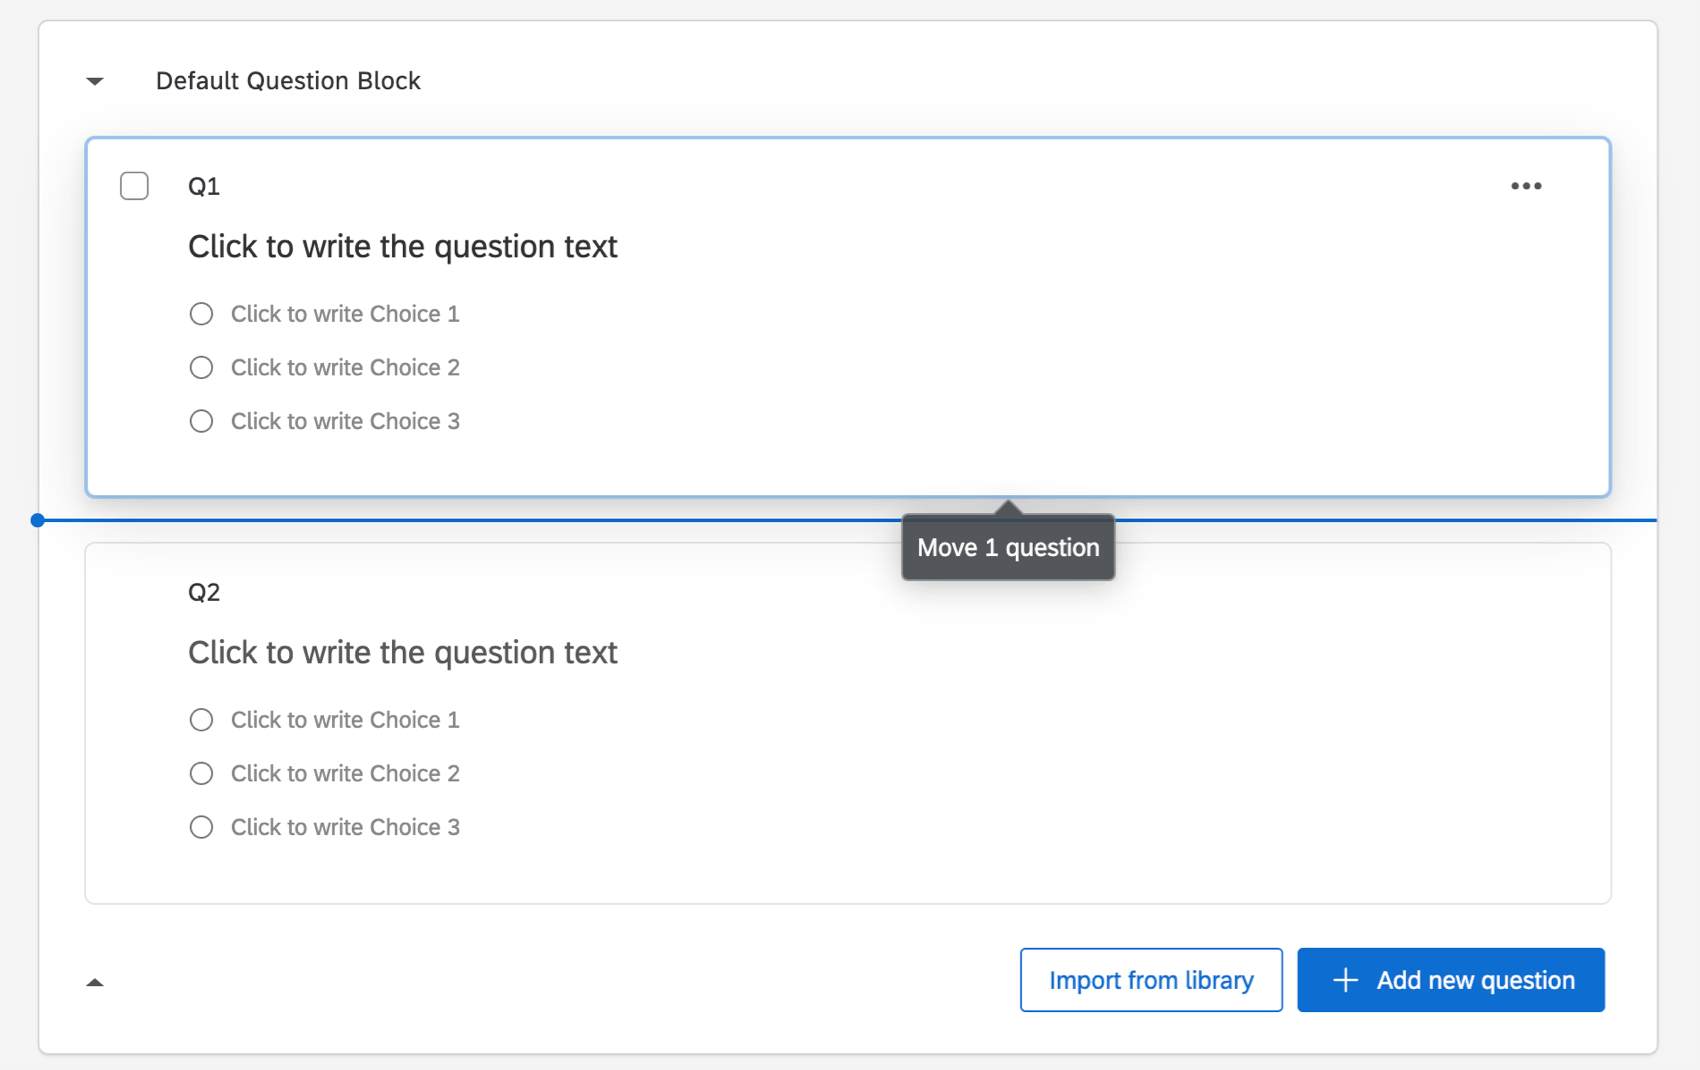 Qtip: Be careful not to click on the question text or answer choice text, or you’ll end up editing the wording of the question instead of moving the question.
Editing Question Text
You’ll write questions, edit question text, and apply text formatting in the question editing area.
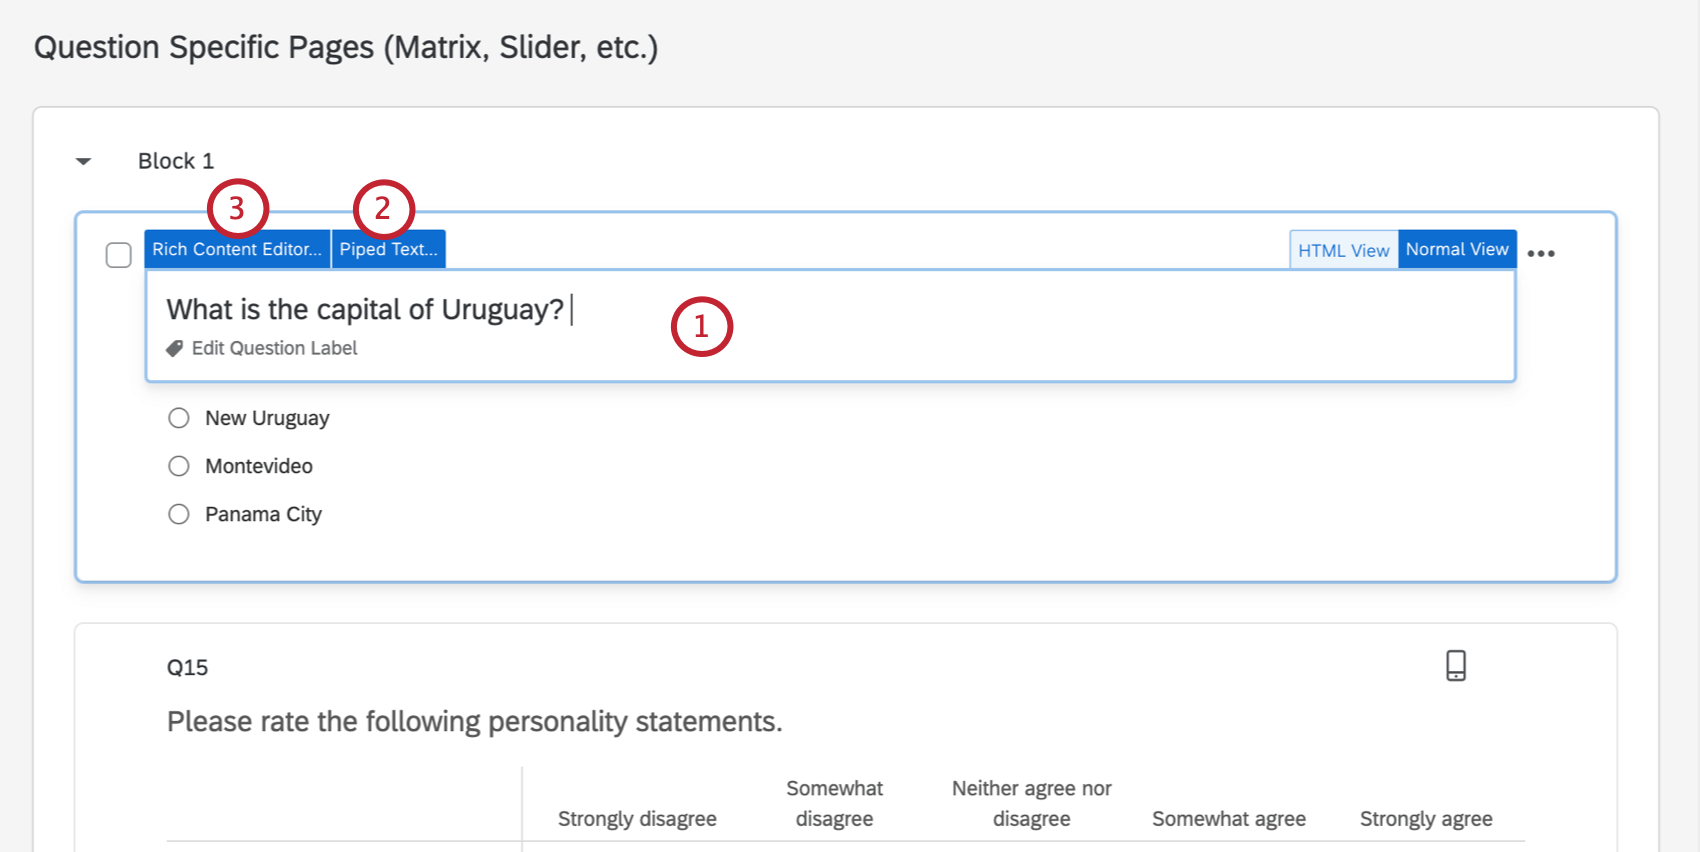
- Click in the question text (or answer choice) text boxes to enter or edit your text.
- Click the Piped Text button to grab information from previous questions and blocks (e.g., pulling in someone’s name from a Demographics Block to personalize a question).
- Click the Rich Content Editor button to format your text by changing fonts, font sizes, applying bolds, bullets, italics, and more.
Participants will see your questions in the order they appear the survey builder, regardless of numerical order in which you created the questions. Read the Auto-Number Questions page if you wish to re-number your questions, but that’s not typically necessary.
Change Question Types
When you first click Create Project, a multiple choice question is inserted into your first question block by default. However, you might want to change it to another type or style of question. Use the question editing pane to choose among more than a dozen question types (e.g., multiple choice, rank order, heat map, NPS, graphic slider, among many others).
To change question types:
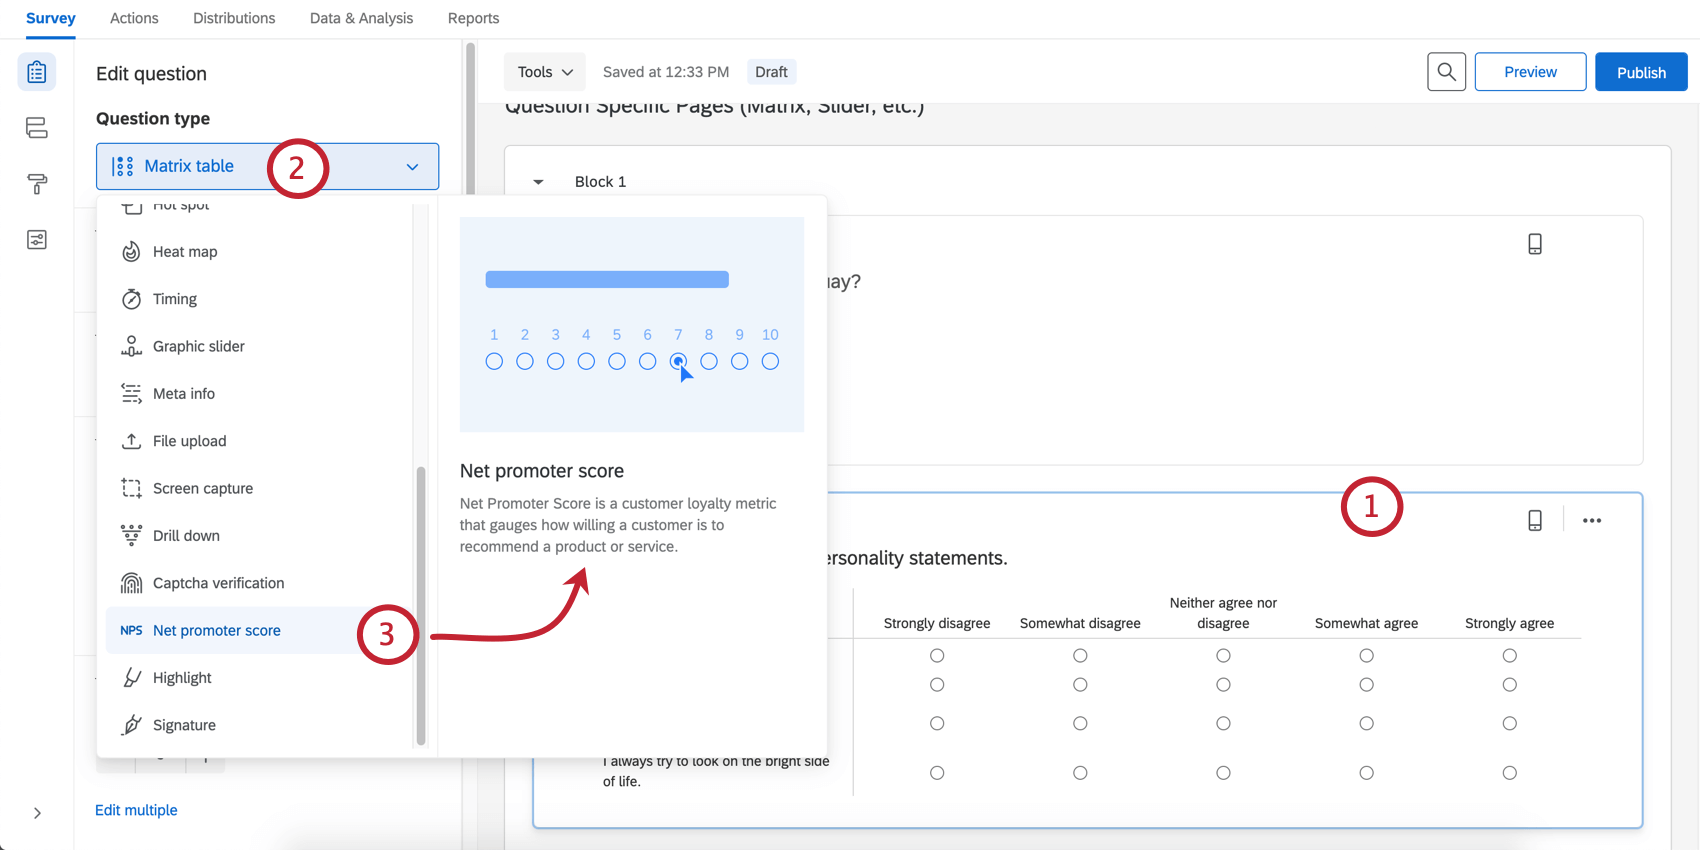
- Open the editing pane by clicking on a question.
- Click the dropdown menu under Question type.
- Hover over an option to get an explanation.
- Click the option to change the question’s type.
Editing Pane Options
You can also use the editing pane to apply specific formatting options available for each unique question type (e.g., suggested choices, vertical or horizontal positioning, force response, etc.).
Let’s demonstrate how these commands work with the matrix table question type:
- Matrix Type: In this case, choose whether the matrix is formatted as a series of Likert scales, as a bipolar table, or more.
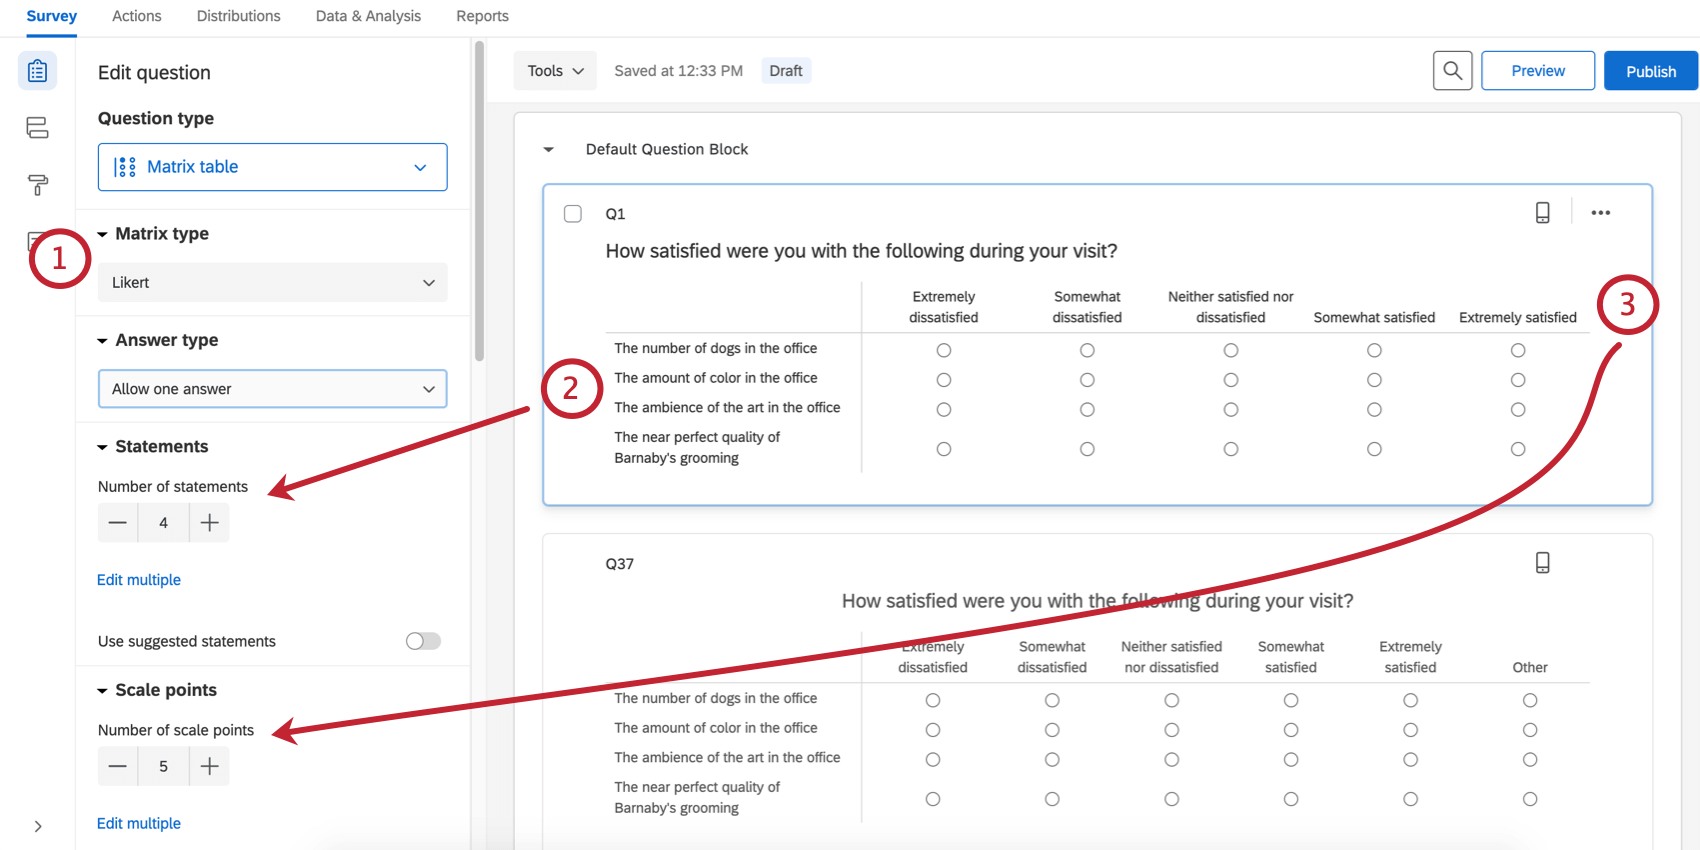
- Statements: Use the + or – buttons to increase or decrease the number of possible statements.
- Scale Points: Use the + or – buttons to increase or decrease the number of possible scale points.
- Response requirements: Click Force response if you want to require a respondent to answer this question before continuing, or add other types of validation.
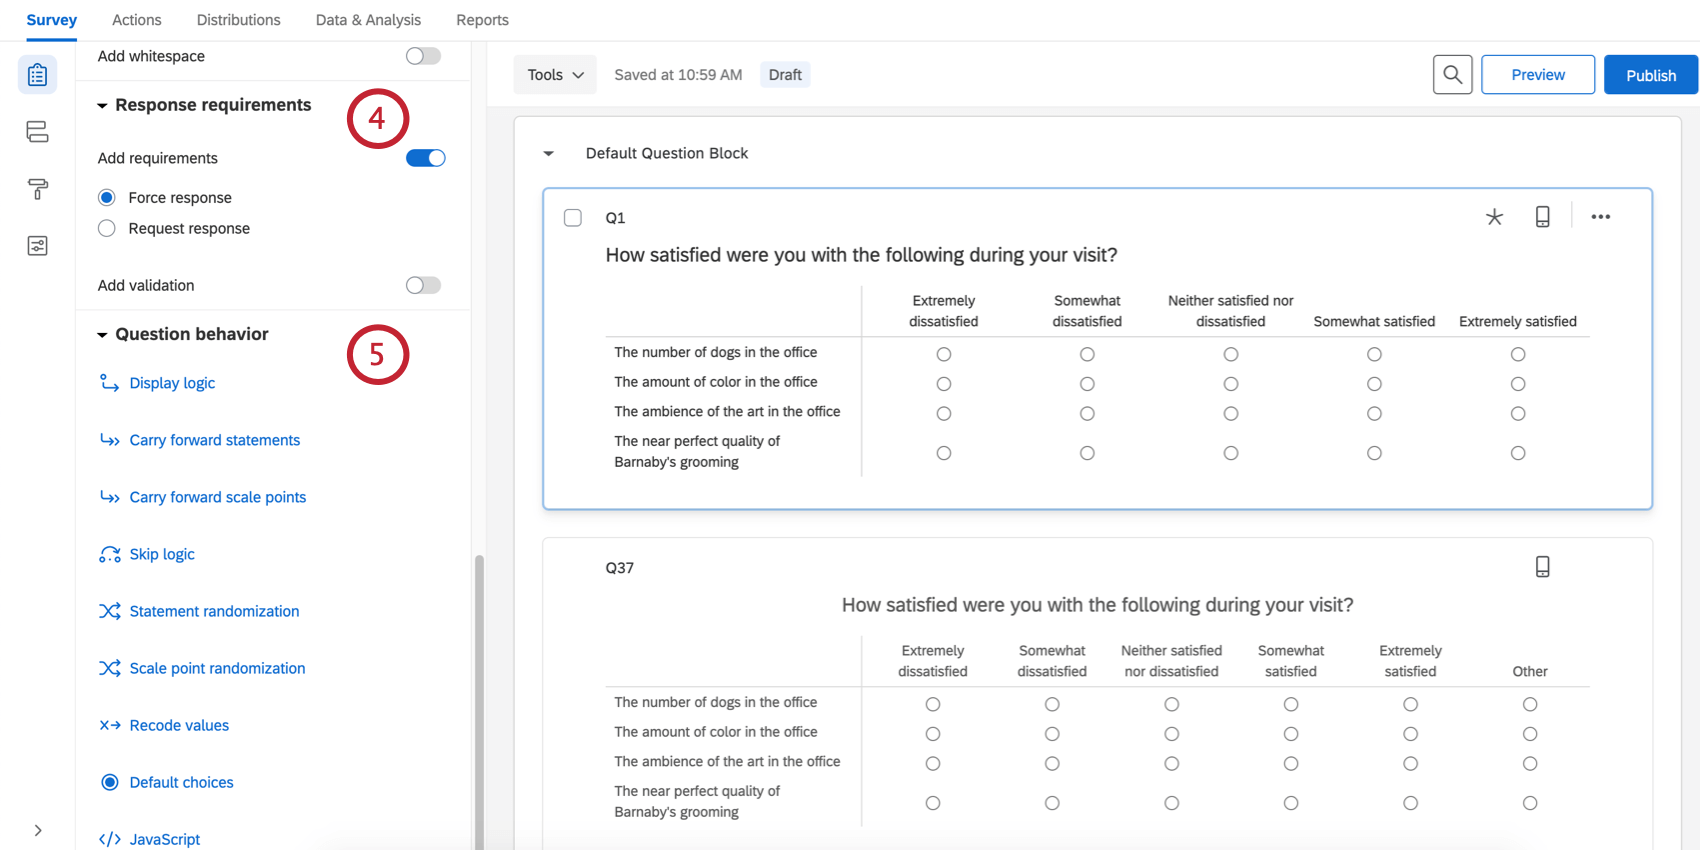
- Question behavior: Add display or skip logic to the question, and more.
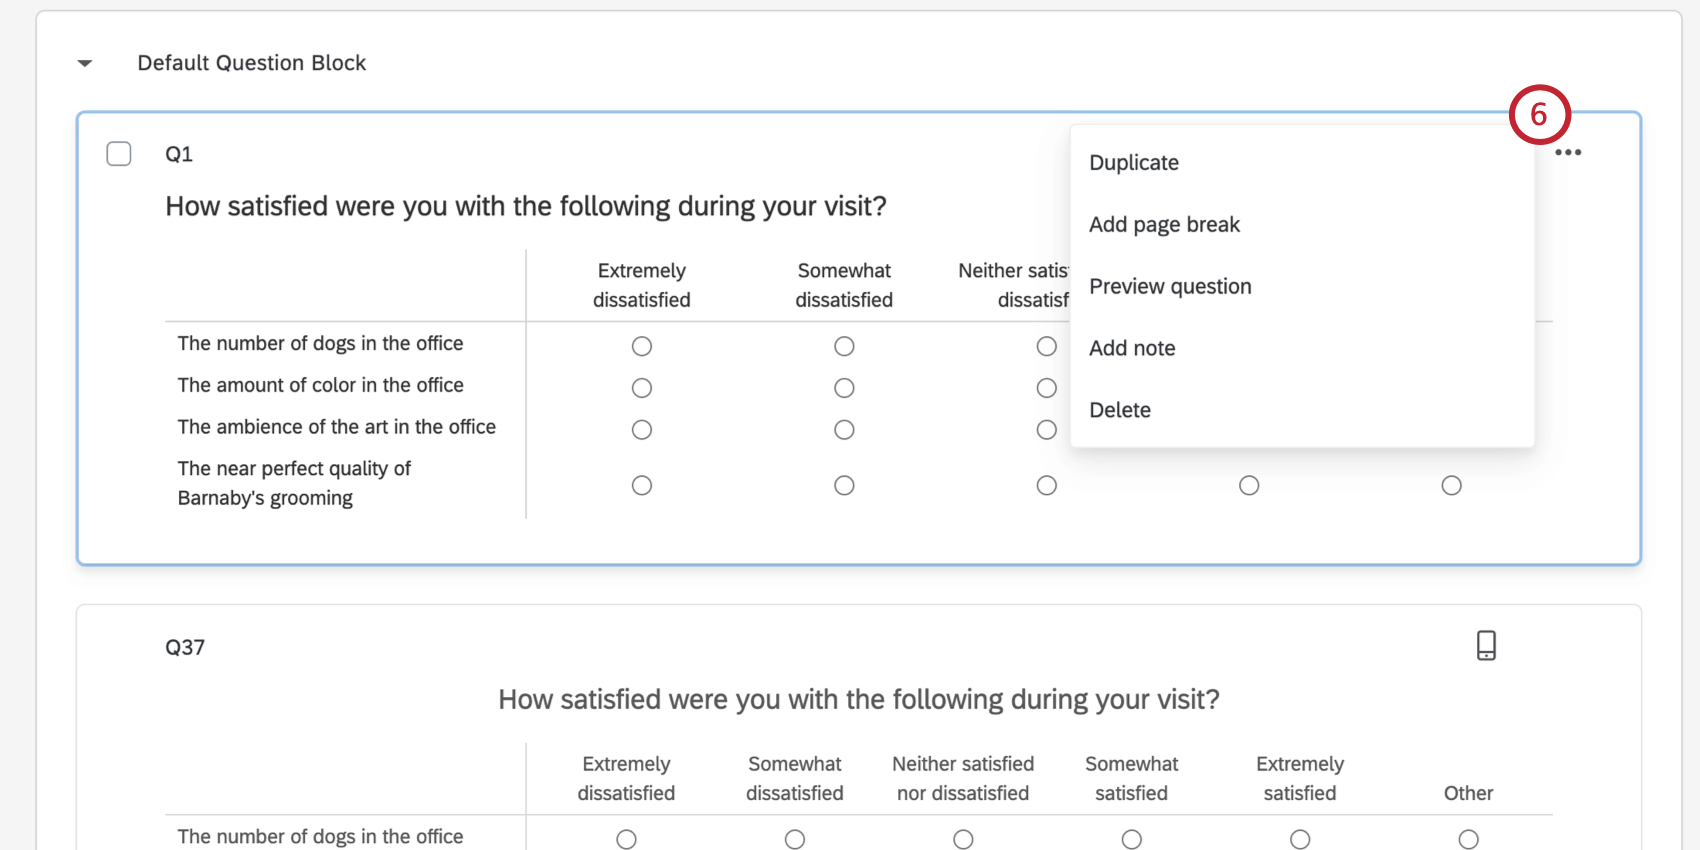
- Question Actions: Lets you duplicate a question, add a page break after it (to separate pages so the respondent won’t see too many questions on a single screen), add a note, and preview questions.
Since there are more than a dozen different question types with a multiplicity of editing pane options for each, you’ll want to explore each of these more in the Creating Questions and Question Types support pages.
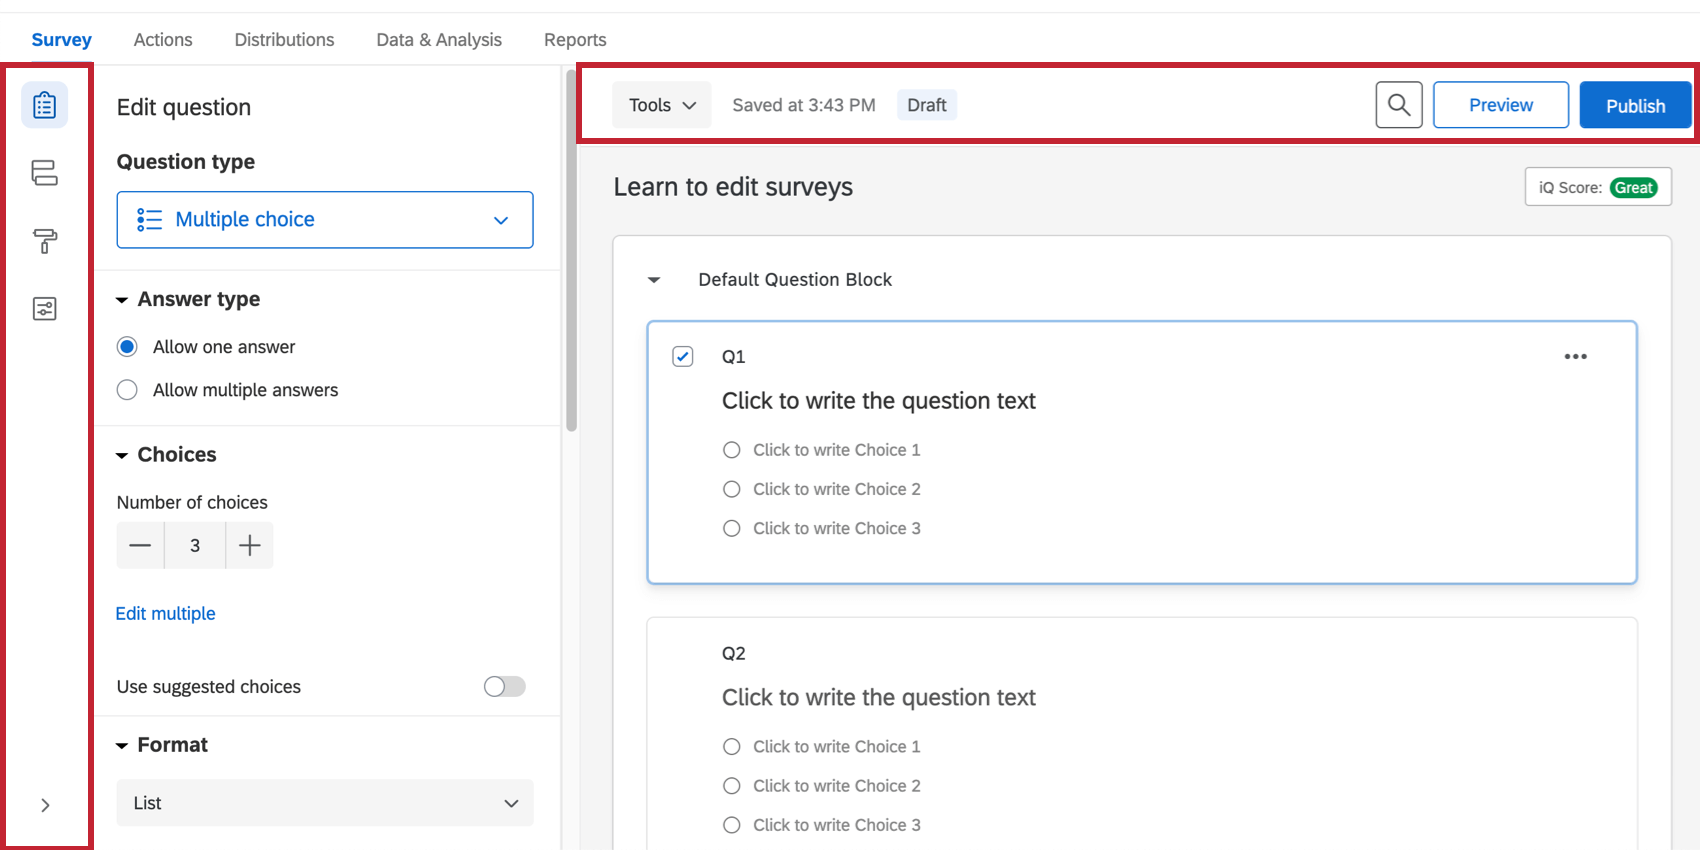
Survey Toolbar and Navigation Basics
The toolbar along the left manages your survey’s design options, security settings, and logic structures (i.e., survey flow). The toolbar along the top also lets you preview, publish, and search your survey.
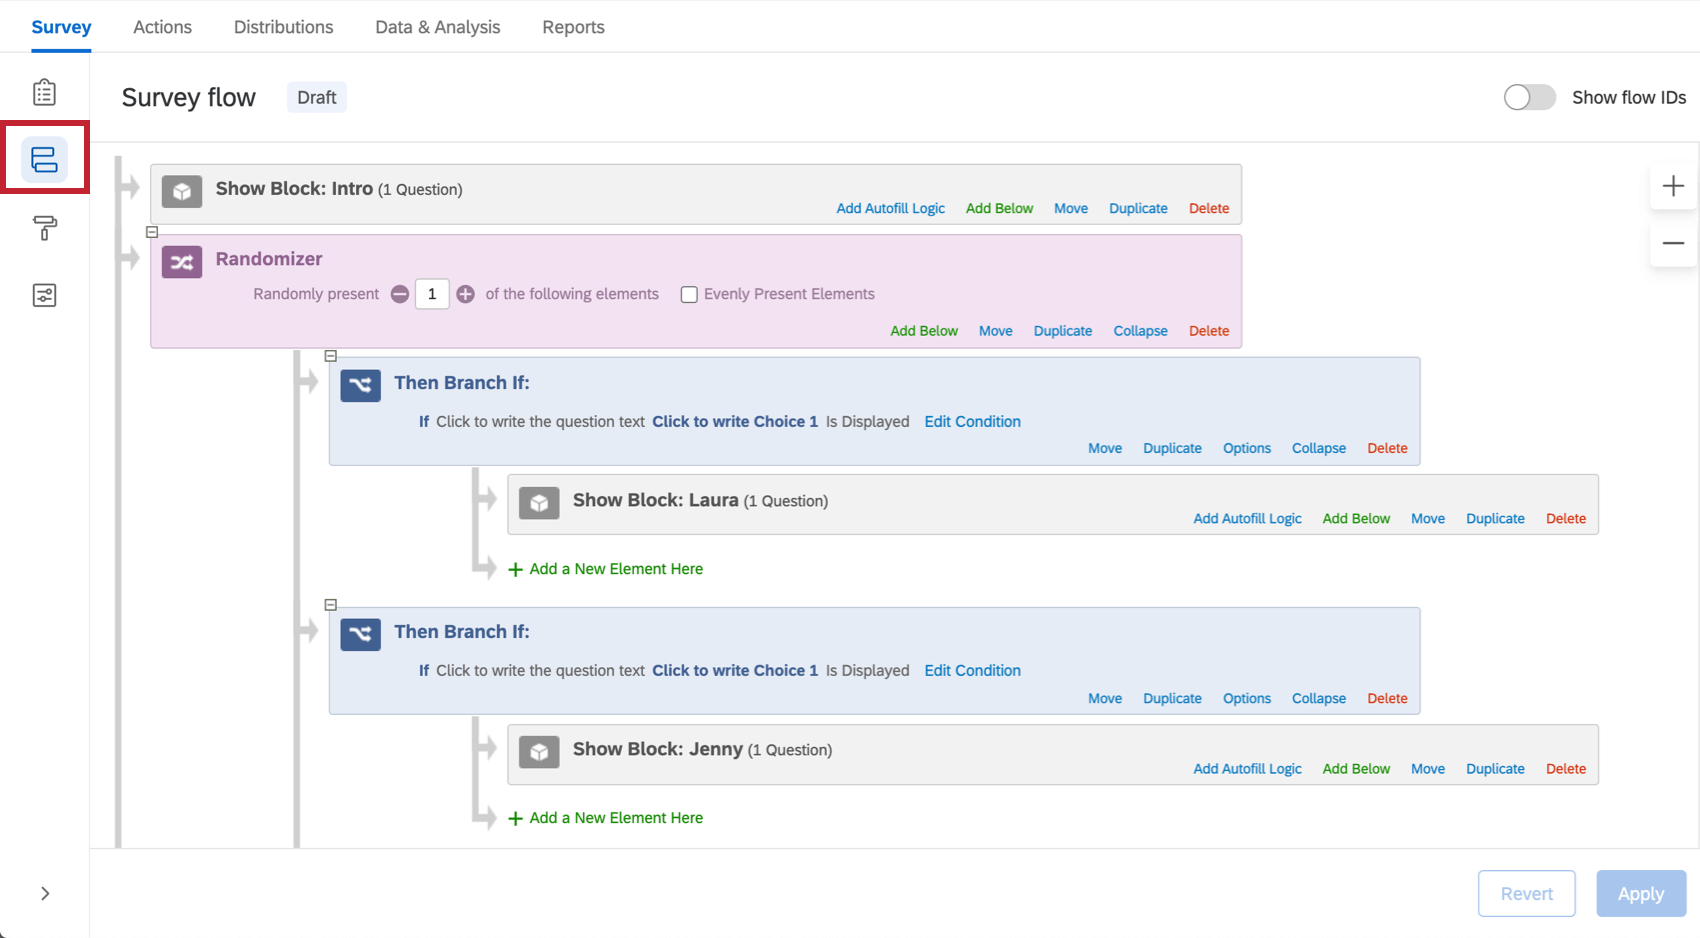
Survey Flow
The Survey flow section gives a block-level view of your survey and details the order in which blocks are displayed to your respondents. From here you can customize where respondents go in your survey, what they see, and what they don’t see.
You can perform simple tasks like rearranging blocks, or you can add elements like branch logic that directs and personalizes your respondents’ survey experience.
By selecting Add Below or Add a New Element Here in the Survey Flow, you can continue to customize your respondent’s path through your survey by adding randomization, authenticators, web services, or new branch logic.
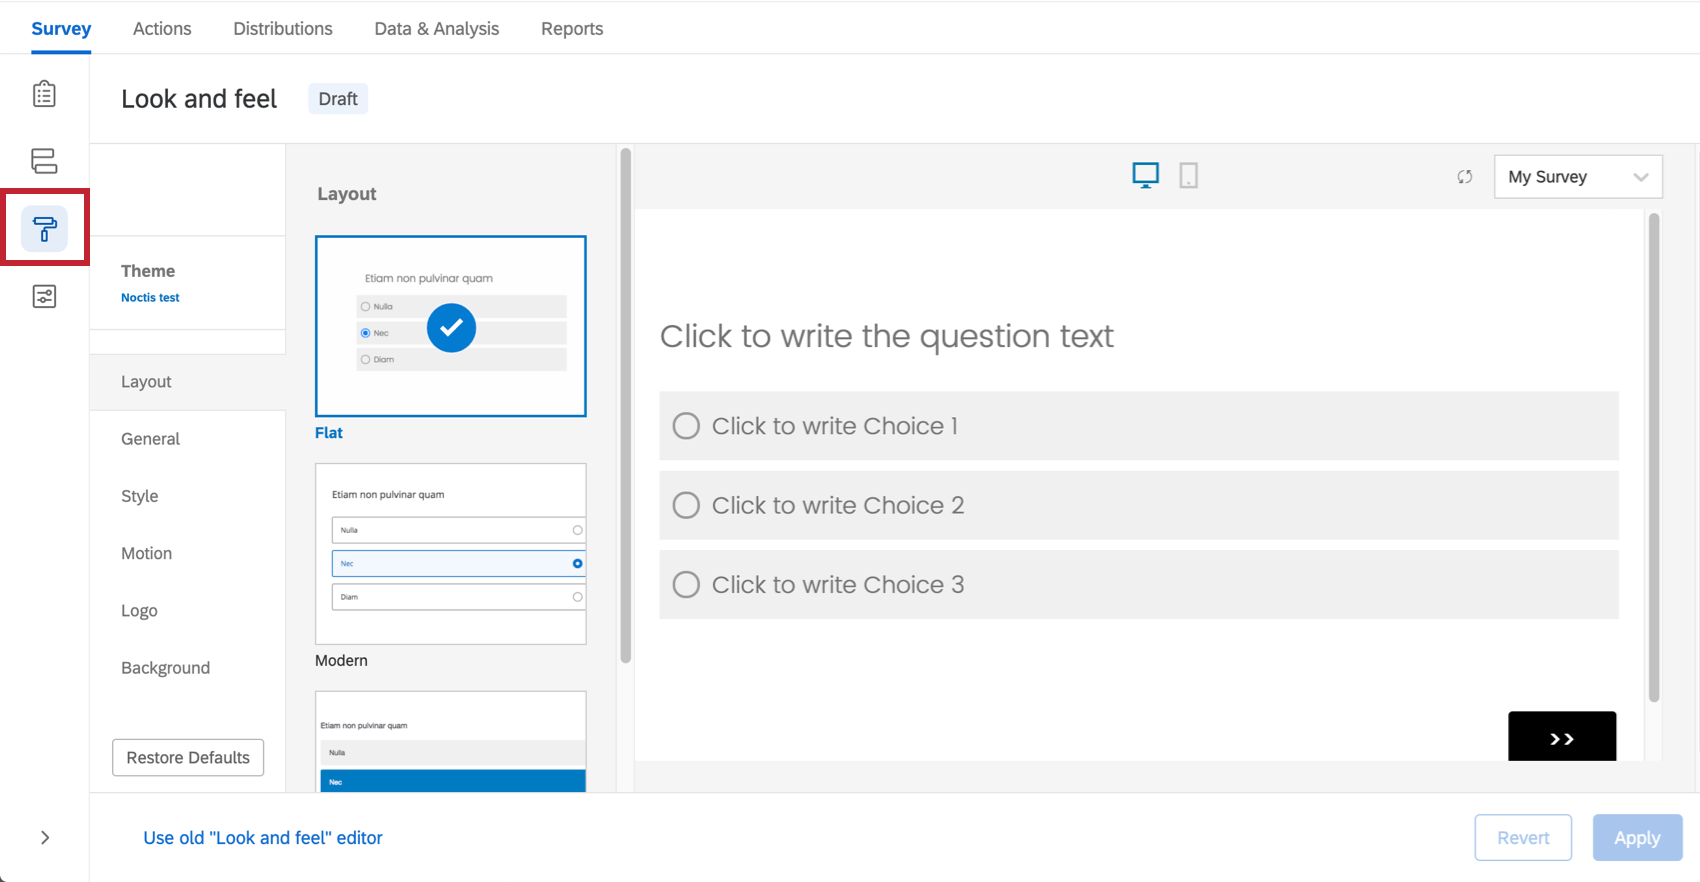
Look & Feel
Your survey’s look and feel must hit the mark. It has been proven again and again that clear, good-looking surveys get better response rates.
The Look & Feel menu opens settings that will help you design your survey, like choosing a theme, fonts, colors, and headers. Here you can apply your institution’s logos and color schemes.
You can also set a variety of survey experience choices, such as displaying a progress bar or having questions highlight upon selection.
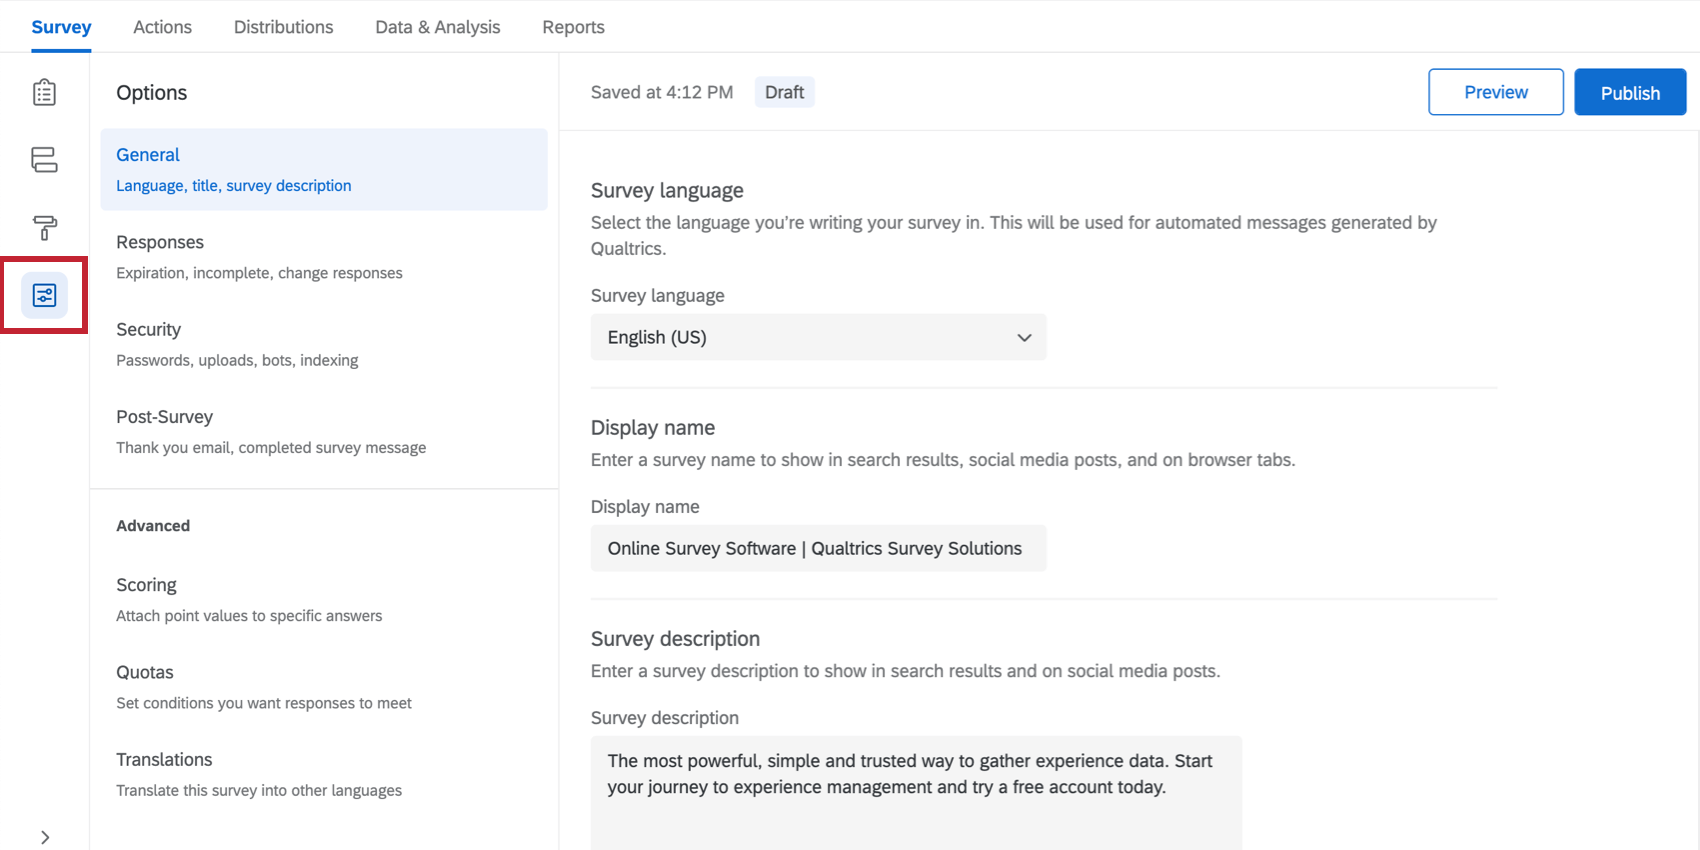
Survey Options
Survey options presents a list of general settings that affect your respondents’ survey experience. These settings include a command to add a back button to your survey, display a custom end of survey message, include question numbers for respondents to see, quotas, translations, scoring, and more.
You can also set security settings for your survey. For example, you can stop respondents from taking a survey more than once, or add password protection to the survey. You can customize general settings too, such as changing a survey’s language.
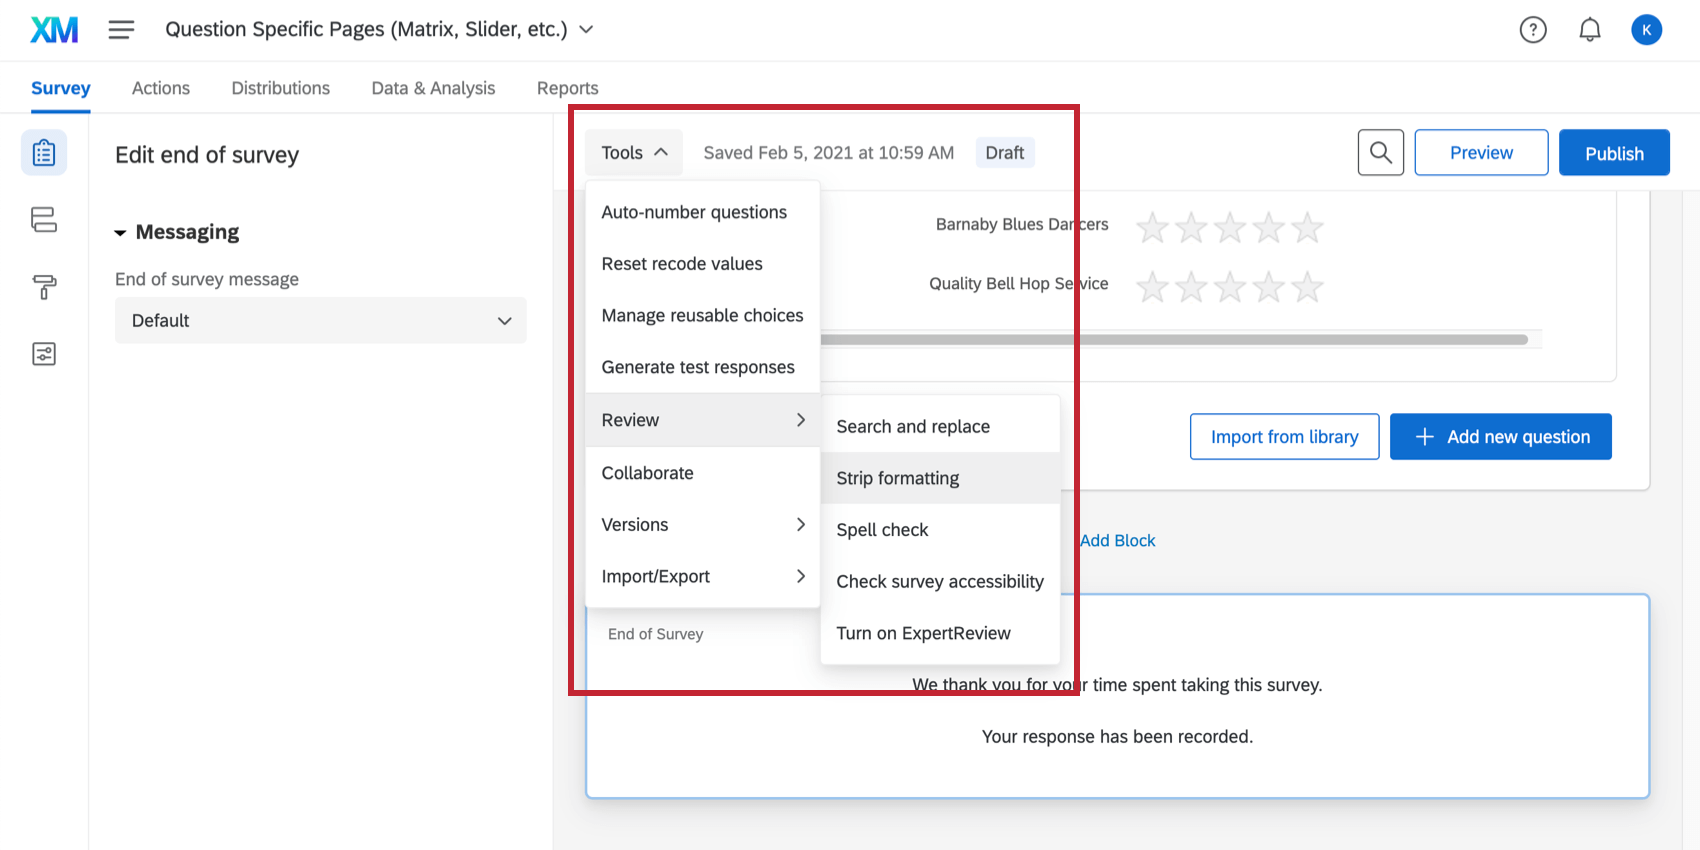
Tools
The Tools dropdown menu contains a variety of advanced survey features. These features include options like auto-number questions, managing reusable choices, and more.
Tools also contains specific survey building aids, like stripping formatting, generating sample responses for testing your surveys and exporting your survey to other formats.
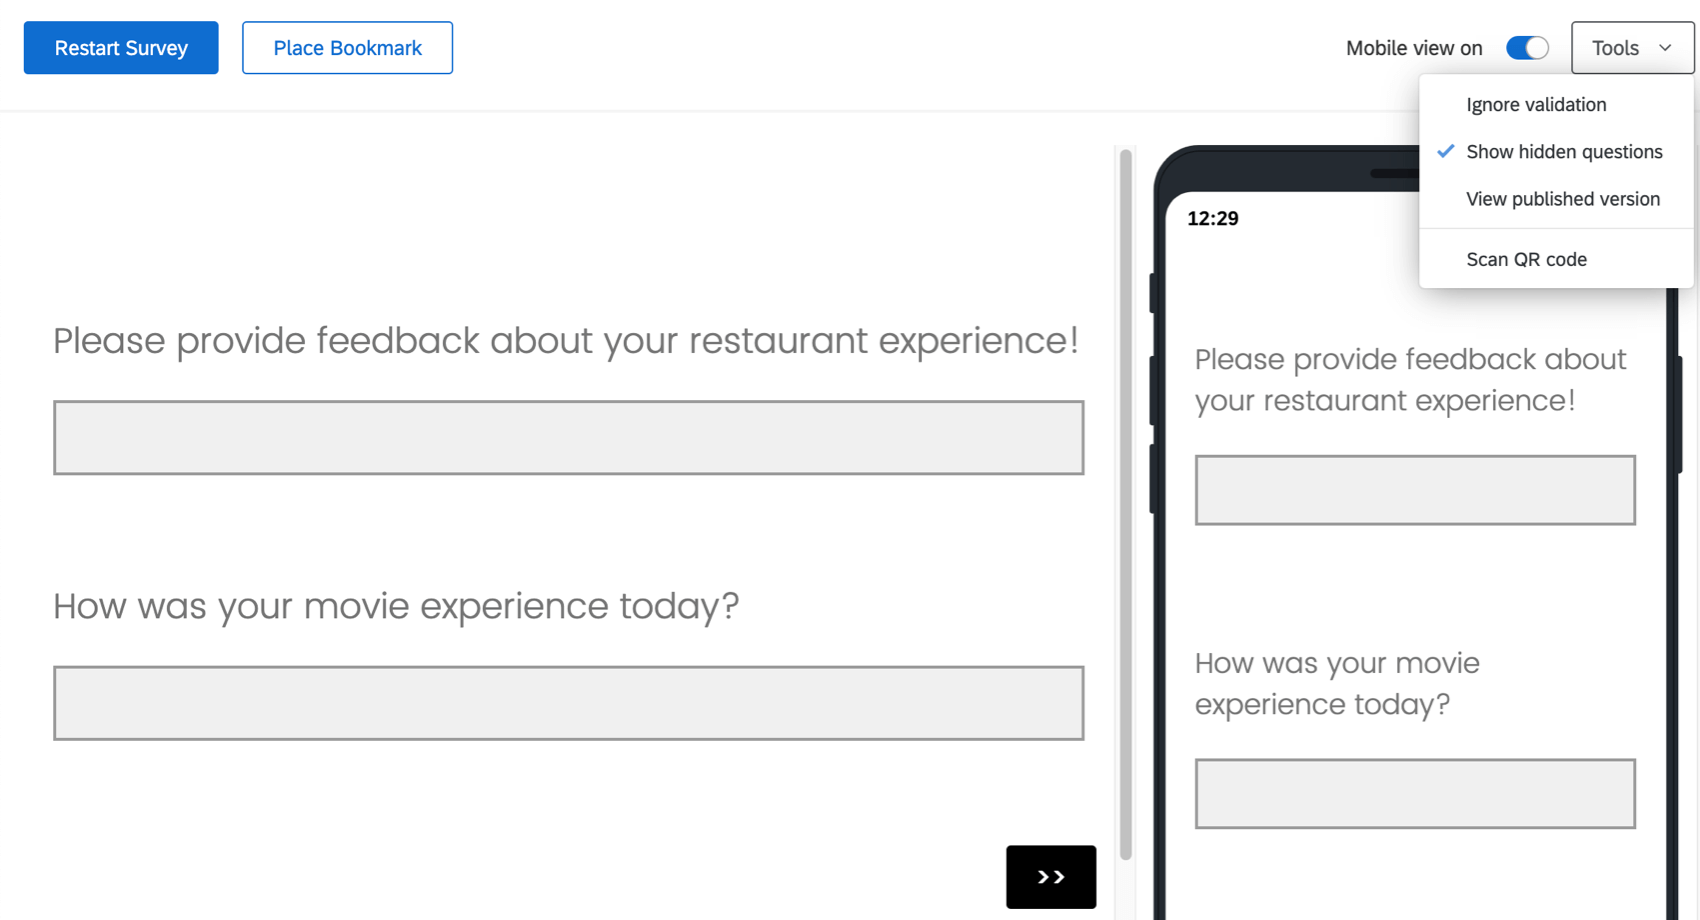
Preview Survey
The preview feature lets you view and experience your survey just as your respondents will. This preview provides both computer screen and mobile device preview options.
Previewing is essential. Think of the preview option as a debugging tool that helps you find all the potential mistakes, logic errors, and readability issues you may have missed when you were creating your survey.
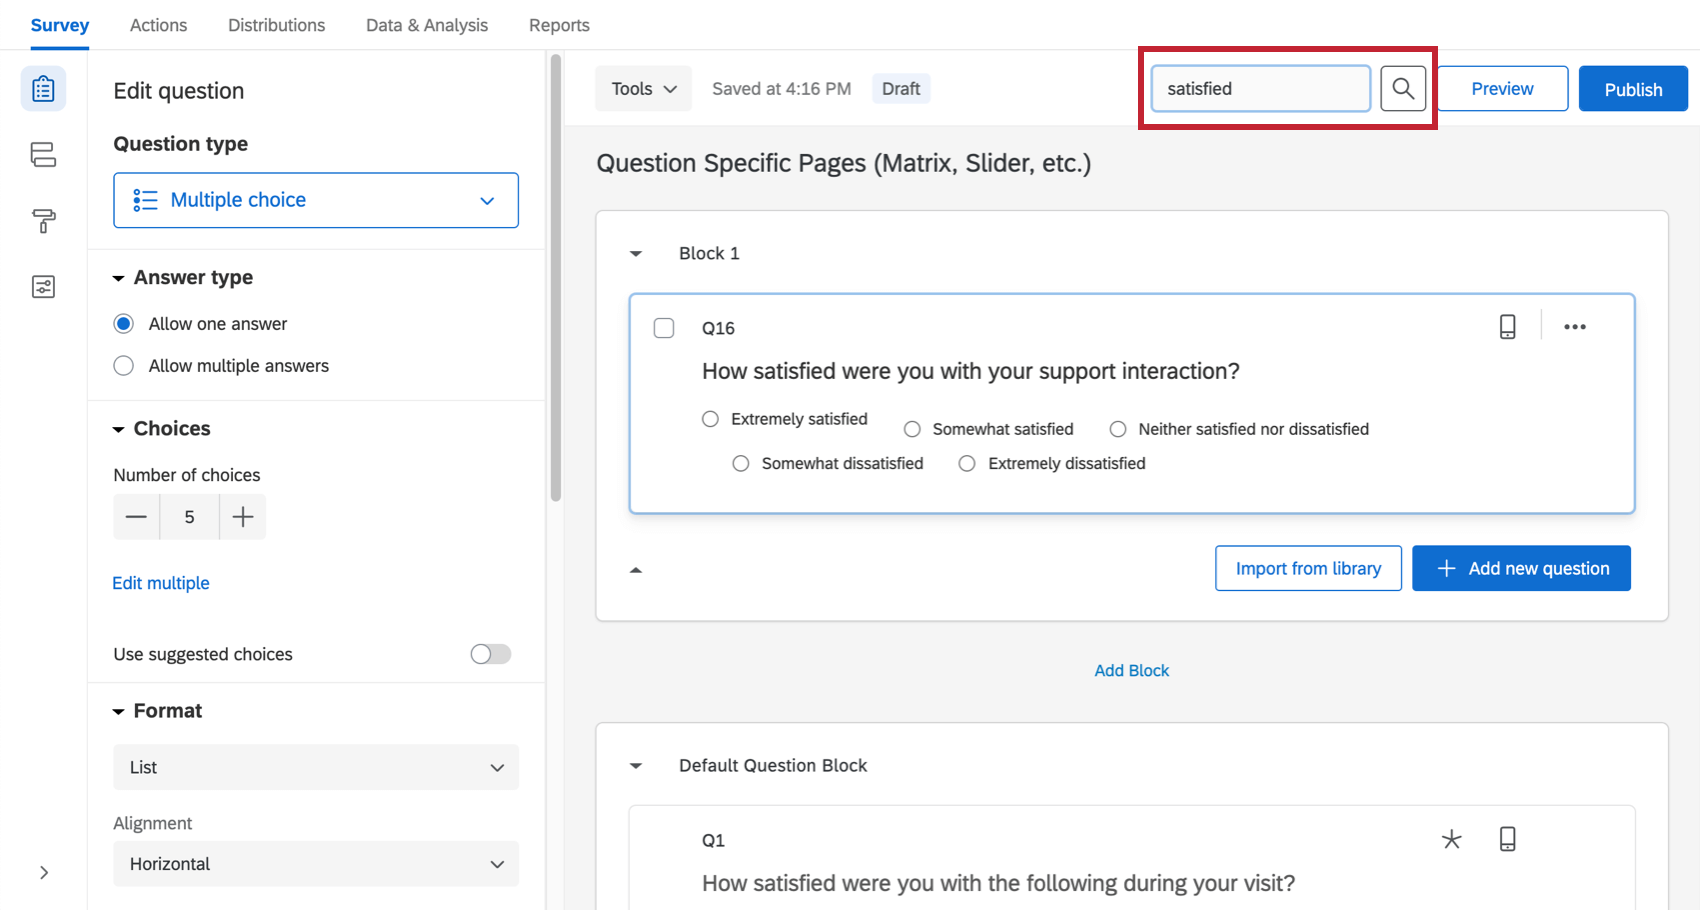
Search
The search tool allows you to find questions and blocks quickly. Just enter a word, or even a part of a word, and the survey will be filtered accordingly. Click the search button, then type in the field that appears.
The search tool can also search for questions by their text, question number (e.g., Q3 or Q17), and internal IDs.
Banner Notifications
Sometimes, banners will appear across the top of the survey builder to tell you something important. We cover some of the most common here.
Changes Won’t Be Live Until You Publish
If you see a yellow banner that states, “You are making edits to this survey. Changes won’t be live until you publish,” see the Publishing support page on how to push your edits live.
Multiple Users Editing the Survey
If you have invited other users to collaborate on your survey, you want to make sure you aren’t making edits at the same time that could cancel each other out. For example, if you’re changing the wording of your survey’s introduction at the same time your colleague is, her edits might override yours.
The banner will read, “Multiple people are editing this survey and you might impact each other’s changes.” It will also tell you how many users are in the survey at the same time, and when you hover over Currently Editing, you can see their names.
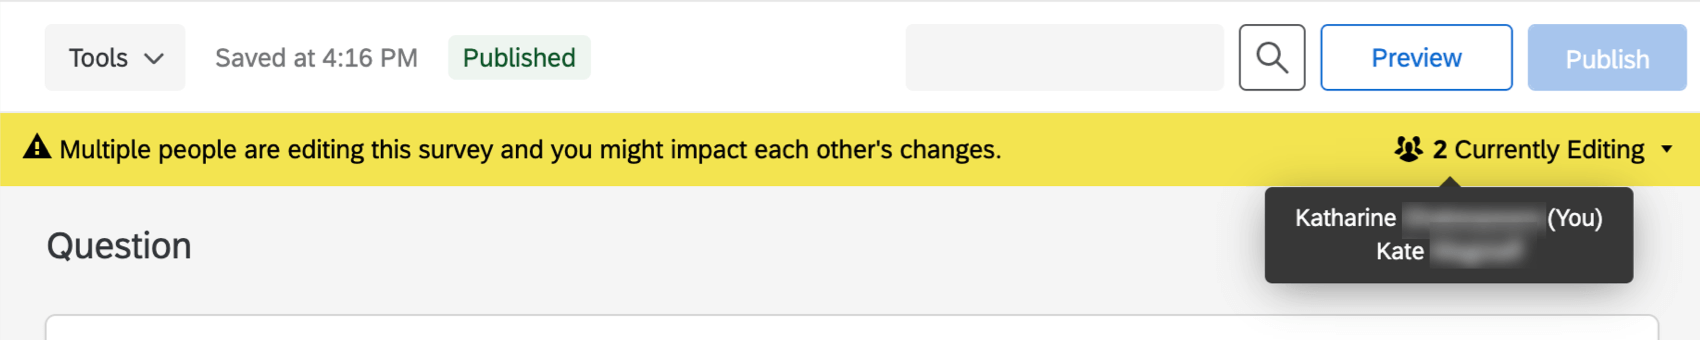
The banner is updated as users enter or exit the survey. Entering the same survey from the same account in multiple tabs will not activate this banner.
File Size Warning
If your survey exceeds 10MB, you will get a warning in red at the top of the survey builder. It reads: “This survey file size is getting too large and could cause performance problems. Consider making changes to reduce its size.”
This warning will not prevent you from making more edits. It is meant to caution you against making a survey too large.
Web Accessibility Standards
If you see a red banner that warns, “This survey does not meet web accessibility standards,” see the Requiring Accessible Surveys support page.